IMPORTANT: We generally recommend using subprofiles in the source structure (newer concept). See Profile in source structure (subprofile).
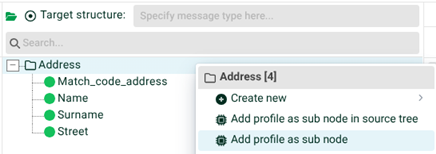
You can use the context menu on a node of the target structure to insert an existing Profile as a subnode in the target structure.
Requirements for a profile to be added (when using a scheduled input agent)
The Mapping is active (and the profile itself).
The profile uses the Integration Unit
PrepareDataForCallingProfilein Phase 5.It has a Response of the "Custom class" type with the
PassBackBinaryDataResponseclass (with the content set to "Output of IU").
IMPORTANT: The class must be executed in the last response, otherwise the function call subprofile () (see below) will generate an error.The options "Enter output channels for each record" and "Incorporate IU" must not be set (see Extended (Phase 2)).
Requirements for a profile to be added (when not using a scheduled input agent)
The mapping is active (and the profile itself).
The profile uses the Integration Unit
PrepareDataForCallingProfileorXMLNoTemplateUnitorJsonCreationUnitin Phase 5.
NOTE:
Internally, the following steps are performed to get an analogous behavior to the first case. The profile is cloned, the Integration Unit
PrepareDataForCallingProfileis set, the parameterStarting nodeis filled with the starting node of the originally set Integration Unit and, if necessary, the response classPassBackBinaryDataResponseis appended. After the call, the clone is discarded.
Adding a profile
Let us assume we have a profile named Contacts that meets all the requirements above. This profile has the following target structure.
IMPORTANT: You can only add one profile per node!
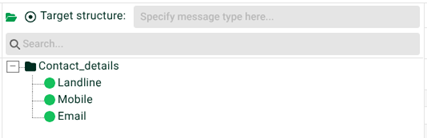
Please do not forget to specify the starting node of profile Contacts in its Integration Unit ①. The (partial) structure starting from this node will be added later.

We now want to add Contacts to the profile as a subnode in the following target structure.
The result looks like this. Please pay attention to the automatically set functions. Except for one spot, you normally do not have to touch these functions.
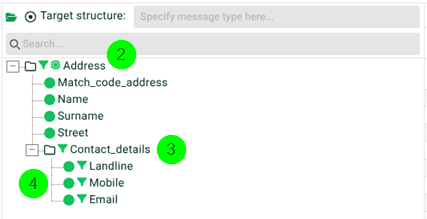
② Here the function call subprofile() is called. Parameter a specifies the name of the added profile. You can use parameter b to start the scheduled input agent of the added profile (if available), otherwise, you have to explicitly specify the input data for the added profile in parameter c.
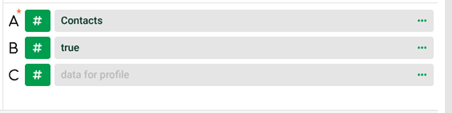
③ Here the function extract result data of sub profile(nodename a) is used to link to the node of the added profile (theoretically you could rename the node here). So Contact_details-> Contact_details.
④ Here the function extract result data of sub profile(field a) is used to link to the respective fields of the added profile (theoretically you could rename the fields here). So Landline-> Landline, Mobile -> Mobile and Email -> Email.
Note on mappings with added profiles
As shown in Mapping - Filling a record of the target tree, data is filled into the Target tree from top to bottom. Although this also applies to the entire subnode that is added here, all the data within the subnode is instantly available. So you could already access the value of field Email in the field Landline, to stay in our example.
Passed variables
All variables are passed as MSG_CALL_ variables (just like in responses of the Message type).