When Lobster Integration acts as an HTTP server, incoming client requests can be authenticated via OAuth.
In this case, Lobster Integration can act as an OAuth 2.0 authorization server and issue access tokens that clients can use to access protected resources securely.
The channel with the OAuth 2.0 server configuration must be assigned to the respective profiles in phase 1 to enable authentication of incoming HTTP(S) requests.
The option to run Lobster Integration as an OAuth 2.0 server can be disabled via the configuration file ./etc/startup.xml by setting the entry <Set name="enableOAuth">false</Set>.
If this entry is missing or is not set to false, Lobster can act as an OAuth 2.0 server if configured accordingly.
Before you begin
To set up the OAuth 2.0 server configuration, create an HTTP(S) channel for the partner selected in the overview. The Lobster Data Platform offers two options.
Option 1: Via the partner context menu
Navigate to Administration > Partners > Partners/Channels. Right-click the desired partner. From the context menu, select Create new channel > Http(s).
Option 2: Via the quick access
Click the green plus button in the bottom right. Select Create new channel > Http(s).
NOTE: For a complete overview of channel management, see Channels.
Settings in channel
The partner ID and partner password must be defined in the "Partner ID (Partner towards me)" tab. Depending on the grant type used, it may be necessary to provide this access data to the client.
The OAuth 2.0 settings can then be accessed via the "OAuth2" button:

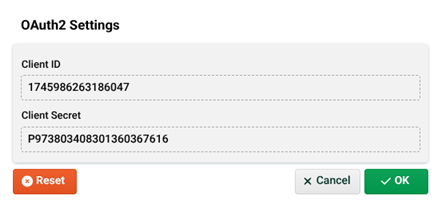
(1) Client ID: The client ID is the channel ID.
(2) Client secret: The client secret is based on the partner password, which must therefore be entered. If the partner password is changed, the client secret also changes.
Supported grant types
The grant type determines how an application obtains an access token from the authorization server. It defines the authentication flow depending on the use case, e.g., with user interaction or purely on the server side.
The following grant types are supported:
Grant type | Description |
|---|---|
client_credentials | Used when a client needs to access protected resources directly and without user interaction, for example, for server-side APIs. Here, the client needs the client ID (1) and the client secret (2). NOTE: Instead of the client secret, the client can also use the partner password directly with this grant type. The client requests the token via: <IP/URL of the integration server>/dw/register/oauth/token?grant_type=client_credentials&client_id=<CLIENT_ID>&client_secret=<CLIENT_SECRET> |
authorization_code | Used when a user needs to authenticate and the application gains access to resources on behalf of the user, typically in web or mobile apps with user login. The access data consists of a partner ID and partner password. After successful authentication and exchange of the authorization code, the client receives both an access token and a refresh token. The access token is used to access protected resources, while the refresh token can be used to obtain a new token after the access token has expired—without the user having to authenticate again. The web page where the access data must be entered on the client side is located at ./webapps/root/oauth2/OAuth2.html. The URLs required for the workflow, which the client must query, are: Authorization code flow: <IP/URL of the Integration Server>/dw/register/oauth/authorize?response_type=code&client_id=<CLIENT_ID>&state=<STATE>&redirect_uri=<REDIRECT_URI> Token request: <IP/URL of the Integration Server>/dw/register/oauth/token?grant_type=authorization_code&code=<AUTHORIZATION_CODE>&redirect_uri=<REDIRECT_URI>&client_id=<CLIENT_ID>&client_secret=<CLIENT_SECRET> Refresh token: <IP/URL of the Integration Server>/dw/register/oauth/token?grant_type=refresh_token&refresh_token=<REFRESH_TOKEN>&client_id=<CLIENT_ID>&client_secret=<CLIENT_SECRET> |
Endpoints
The following endpoints are relevant for retrieving and processing OAuth 2.0 tokens:
Token endpoint: http(s)://<IP/URL of the Integration Server>/dw/register/oauth/token
Used by the client to obtain an access token (and, if necessary, a refresh token).
Authorization endpoint: http(s)://<IP/URL of the Integration Server>/dw/register/oauth/authorize
Used to initiate the authorization code flow. Here, the user authenticates themselves and grants access.
Code verifier endpoint: http(s)://<IP/URL of the Integration Server>/dw/register/oauth/verify
Only required for authorization code flows with code challenge to verify the code verifier.
NOTE: If a DMZ server is used, the setup shown here stays the same on the inner Integration Server. On the DMZ server, add the following forwardings to configuration file ./etc/forward.properties. Replace http(s):// with the scheme you actually use (https:// for production environments). Replace <Host:Port of the inner Integration Server> with the host name or IP address and port. Do not add a trailing slash.
/dw/register/oauth/token=http(s)://<Host:Port of the inner Integration Server>/dw/register/oauth/token
/dw/register/oauth/authorize=http(s)://<Host:Port of the inner Integration Server>/dw/register/oauth/authorize
/dw/register/oauth/verify=http(s)://<Host:Port of the inner Integration Server>/dw/register/oauth/verify
Example with concrete values:
/dw/register/oauth/token=https://integration.intern.example.com:8443/dw/register/oauth/token
/dw/register/oauth/authorize=https://integration.intern.example.com:8443/dw/register/oauth/authorize
/dw/register/oauth/verify=https://integration.intern.example.com:8443/dw/register/oauth/verify
Tokens
Json web tokens
This is the new default setting (→ see issues with classical tokens).
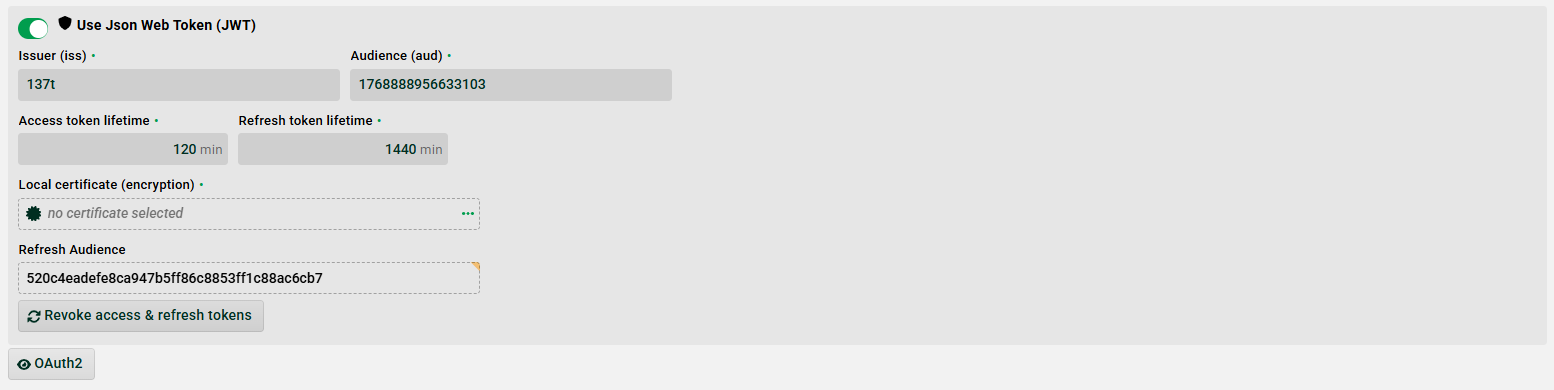
(1) Issuer (iss): The entity that issues the token. You can use the default value ("webServiceUrl" from configuration file ./etc/startup.xml or the installation ID if not configured).
(2) Audience (aud): Additional identifier, because "Issuer" can be used for multiple channels. Default: The channel ID.
(3) Access token lifetime: If this time is in the past, a new token needs to be requested.
(4) Refresh token lifetime: If this time is in the past, a new token needs to be requested.
(5) Local certificate (encryption): Local certificate used to sign the token. Only RSA certificates are allowed.
(6) Refresh Audience: Audience used for the refresh token.
(7) Revoke access & refresh tokens: This will change the "Refresh Audience" value and also internal claims for the access token. When pressed, all created access and refresh tokens will be invalid.
Classical tokens
If the "Use Json Web Token (JWT)" option is not set, a classical token will be issued. We do not recommend this setting, because there can only be one current classical token in the database for a channel. If there are several clients that access a profile using a channel that has OAuth2 configured, every client will request a new token and therefore invalidate old tokens that have already been received by other clients. This will lead to performance issues and can also create database deadlock exceptions. Please use the "Use Json Web Token (JWT)" option to avoid this issue.
View after successful token query
If the client has requested a token, an extended view is displayed showing the currently valid access token (3), the expiration time (4), and the refresh token (5).
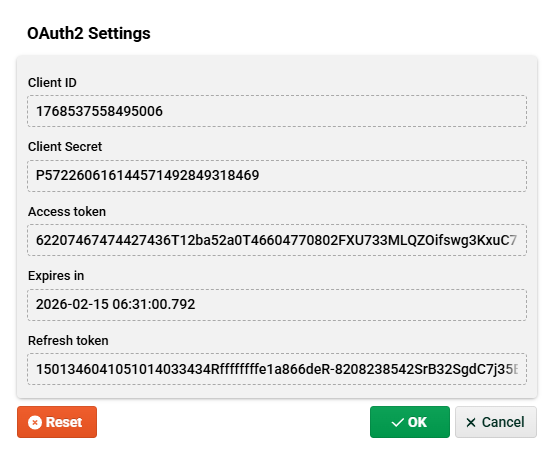
(3) Access token: Short-lived key that allows access to resources protected by this channel.
(4) Expires in: Expiration date of the token. By default, the access token is valid for 30 days. This can be changed via the System properties hub.datawizard.oauth.expiresIn=<number_in_seconds> in ./etc/wrapper.conf (Windows) or ./bin/execute.sh (Linux).
(5) Refresh token: Long-lived key that can be used to request a new access token without having to log in again.
(6) Reset: Delete entries after token retrieval and restore the original state.