The Trading Partner Manager runs in the Lobster Cloud. You use it to set up communication channels together with your partners.
First, register your Lobster Data Platform in the Trading Partner Manager. Next, set up the communication parameters. Then invite your partner to do the same. Once both sides are done, the Trading Partner Manager creates the communication channels. They appear automatically on the Lobster Data Platform. The channels are ready to use immediately.
For background on the architecture, see Trading Partner Manager: Architecture and how it works.
Prerequisites
You are logged in with a user that has a valid e-mail address. Check this under Administration > Accounts > Users > Communication infos (Type = E-Mail, Value = <your email address>).
Your certificates for the partner channels are already available. You find them on the Lobster Data Platform under Administration > Partners > Certificates.
Registering the environment (LDP user)
First, register your environment in the Trading Partner Manager
Procedure
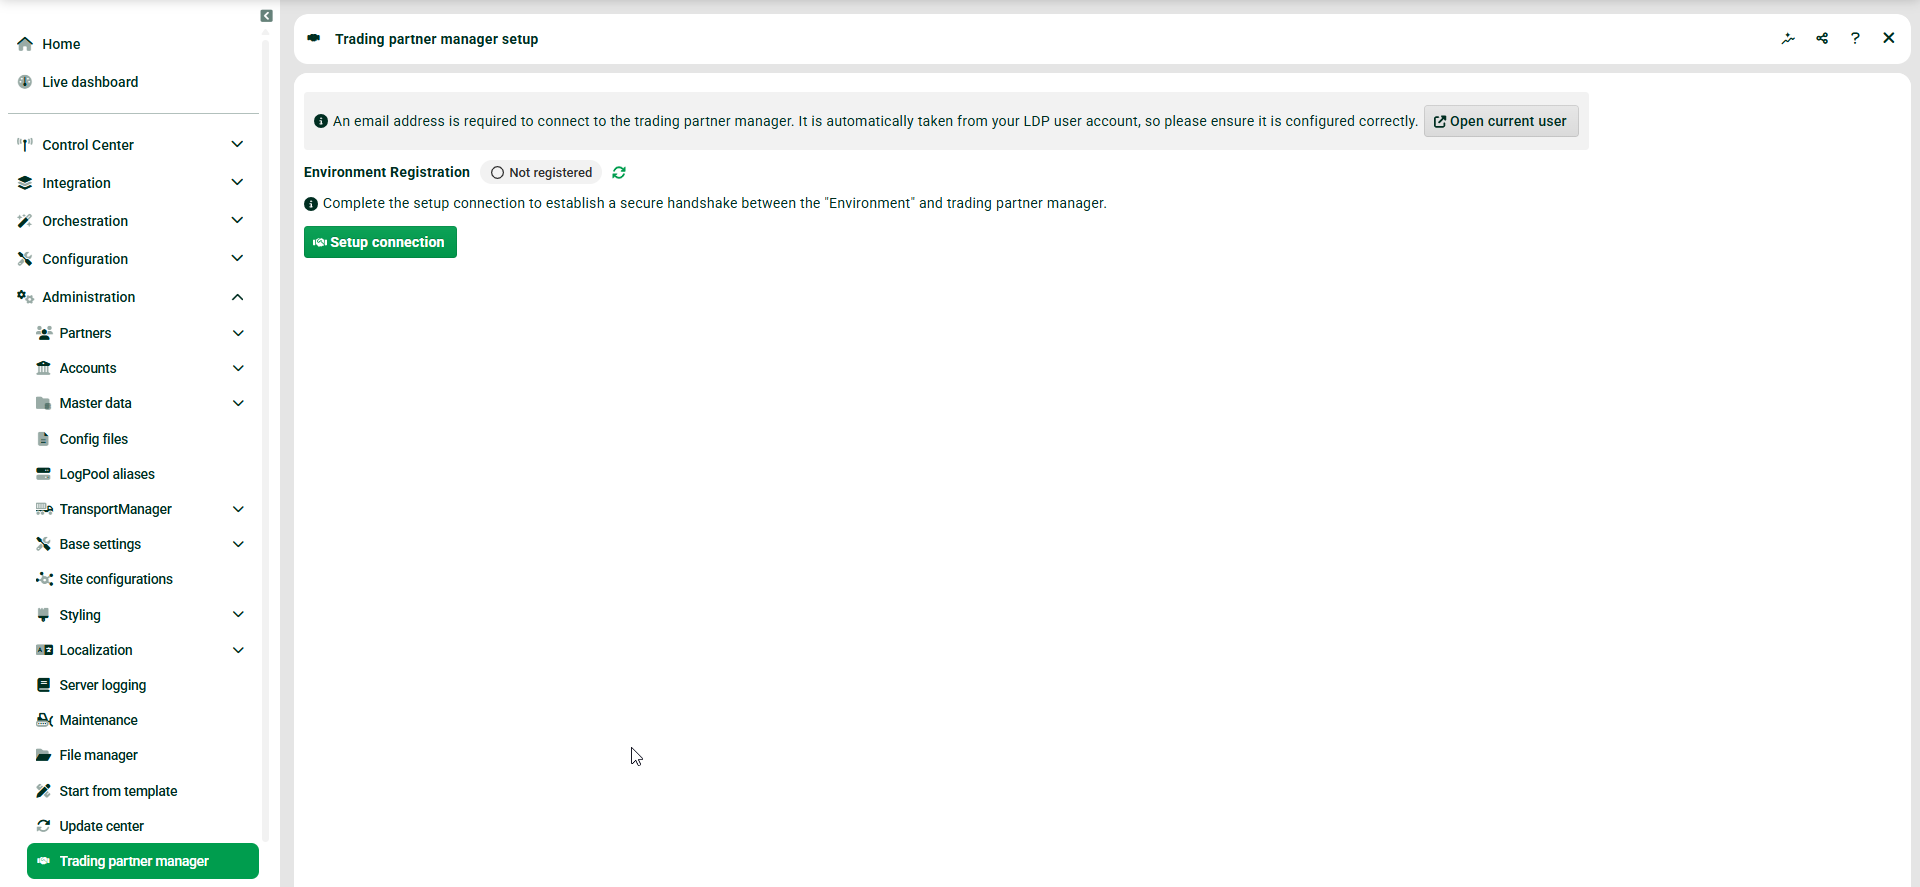
On your Lobster Data Platform, navigate to Administration > Trading partner manager.
Click Setup connection.
Result
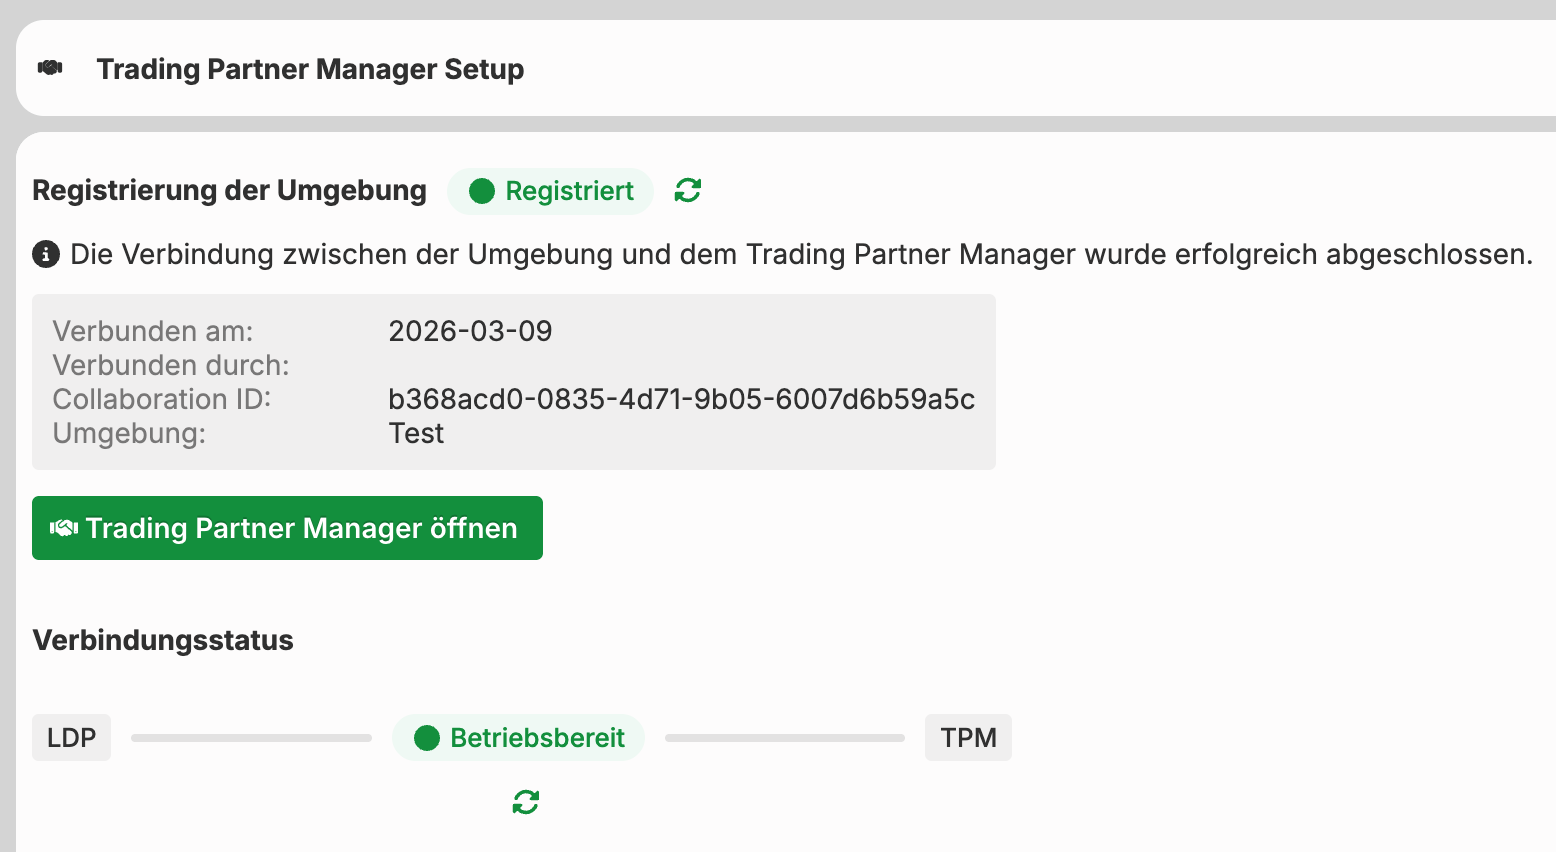
After successful registration, the Lobster Data Platform shows the connected environment.
NOTE: To unregister an environment, contact our support.
Opening the Trading Partner Manager (LDP user)
Click the Open trading partner manager button.
Procedure
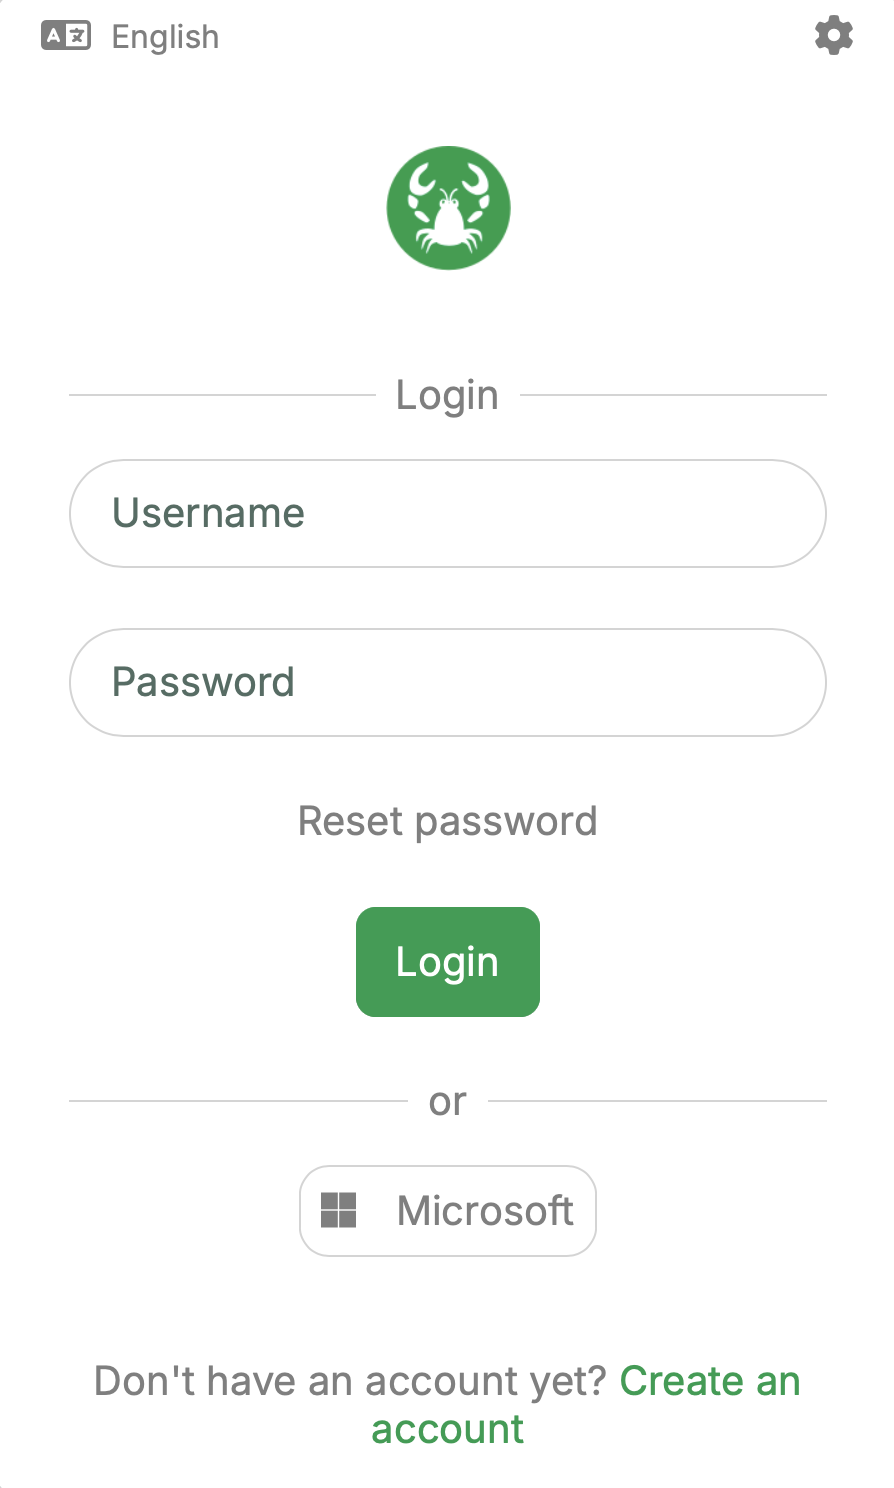
Click the Create an account link. Use your e-mail address.
You receive an e-mail in English from the Trading Partner Portal. Set a new password via the Create Password link in the e-mail.
Log in with the new password.
Result
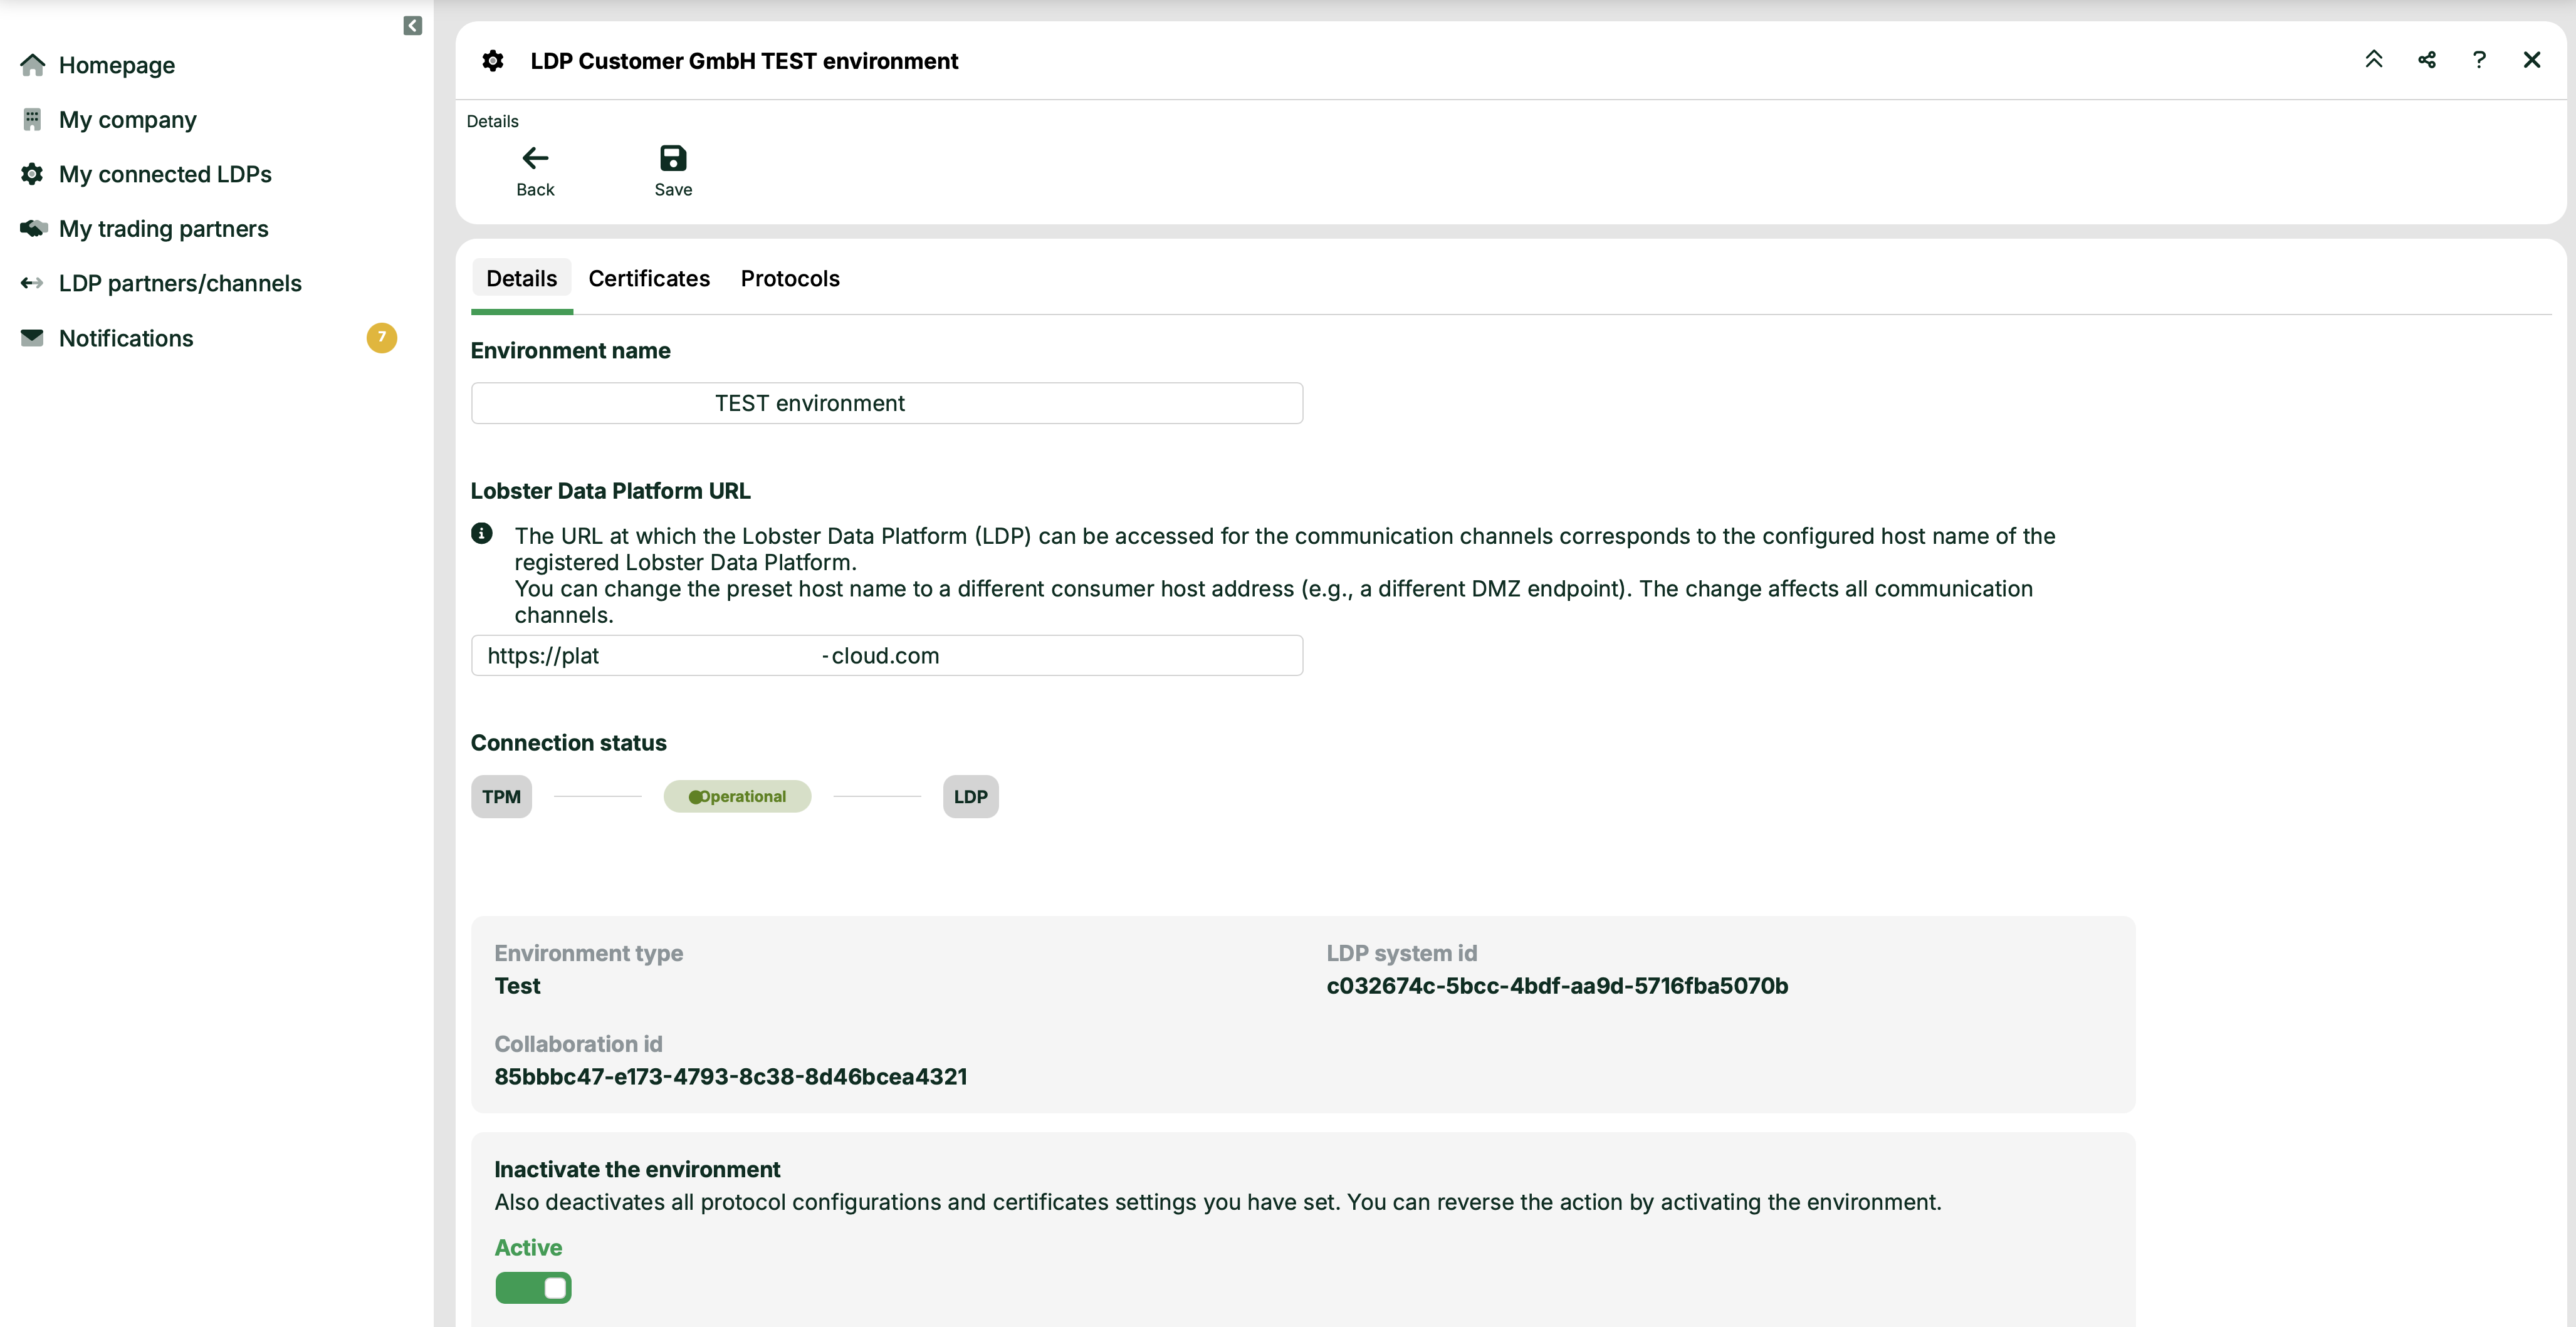
After logging in, you see your registered environment. You find all connected environments via the left menu on the My connected LDPs page.
Use the Active switch to enable and disable the environment.
Uploading legal documents (LDP user)
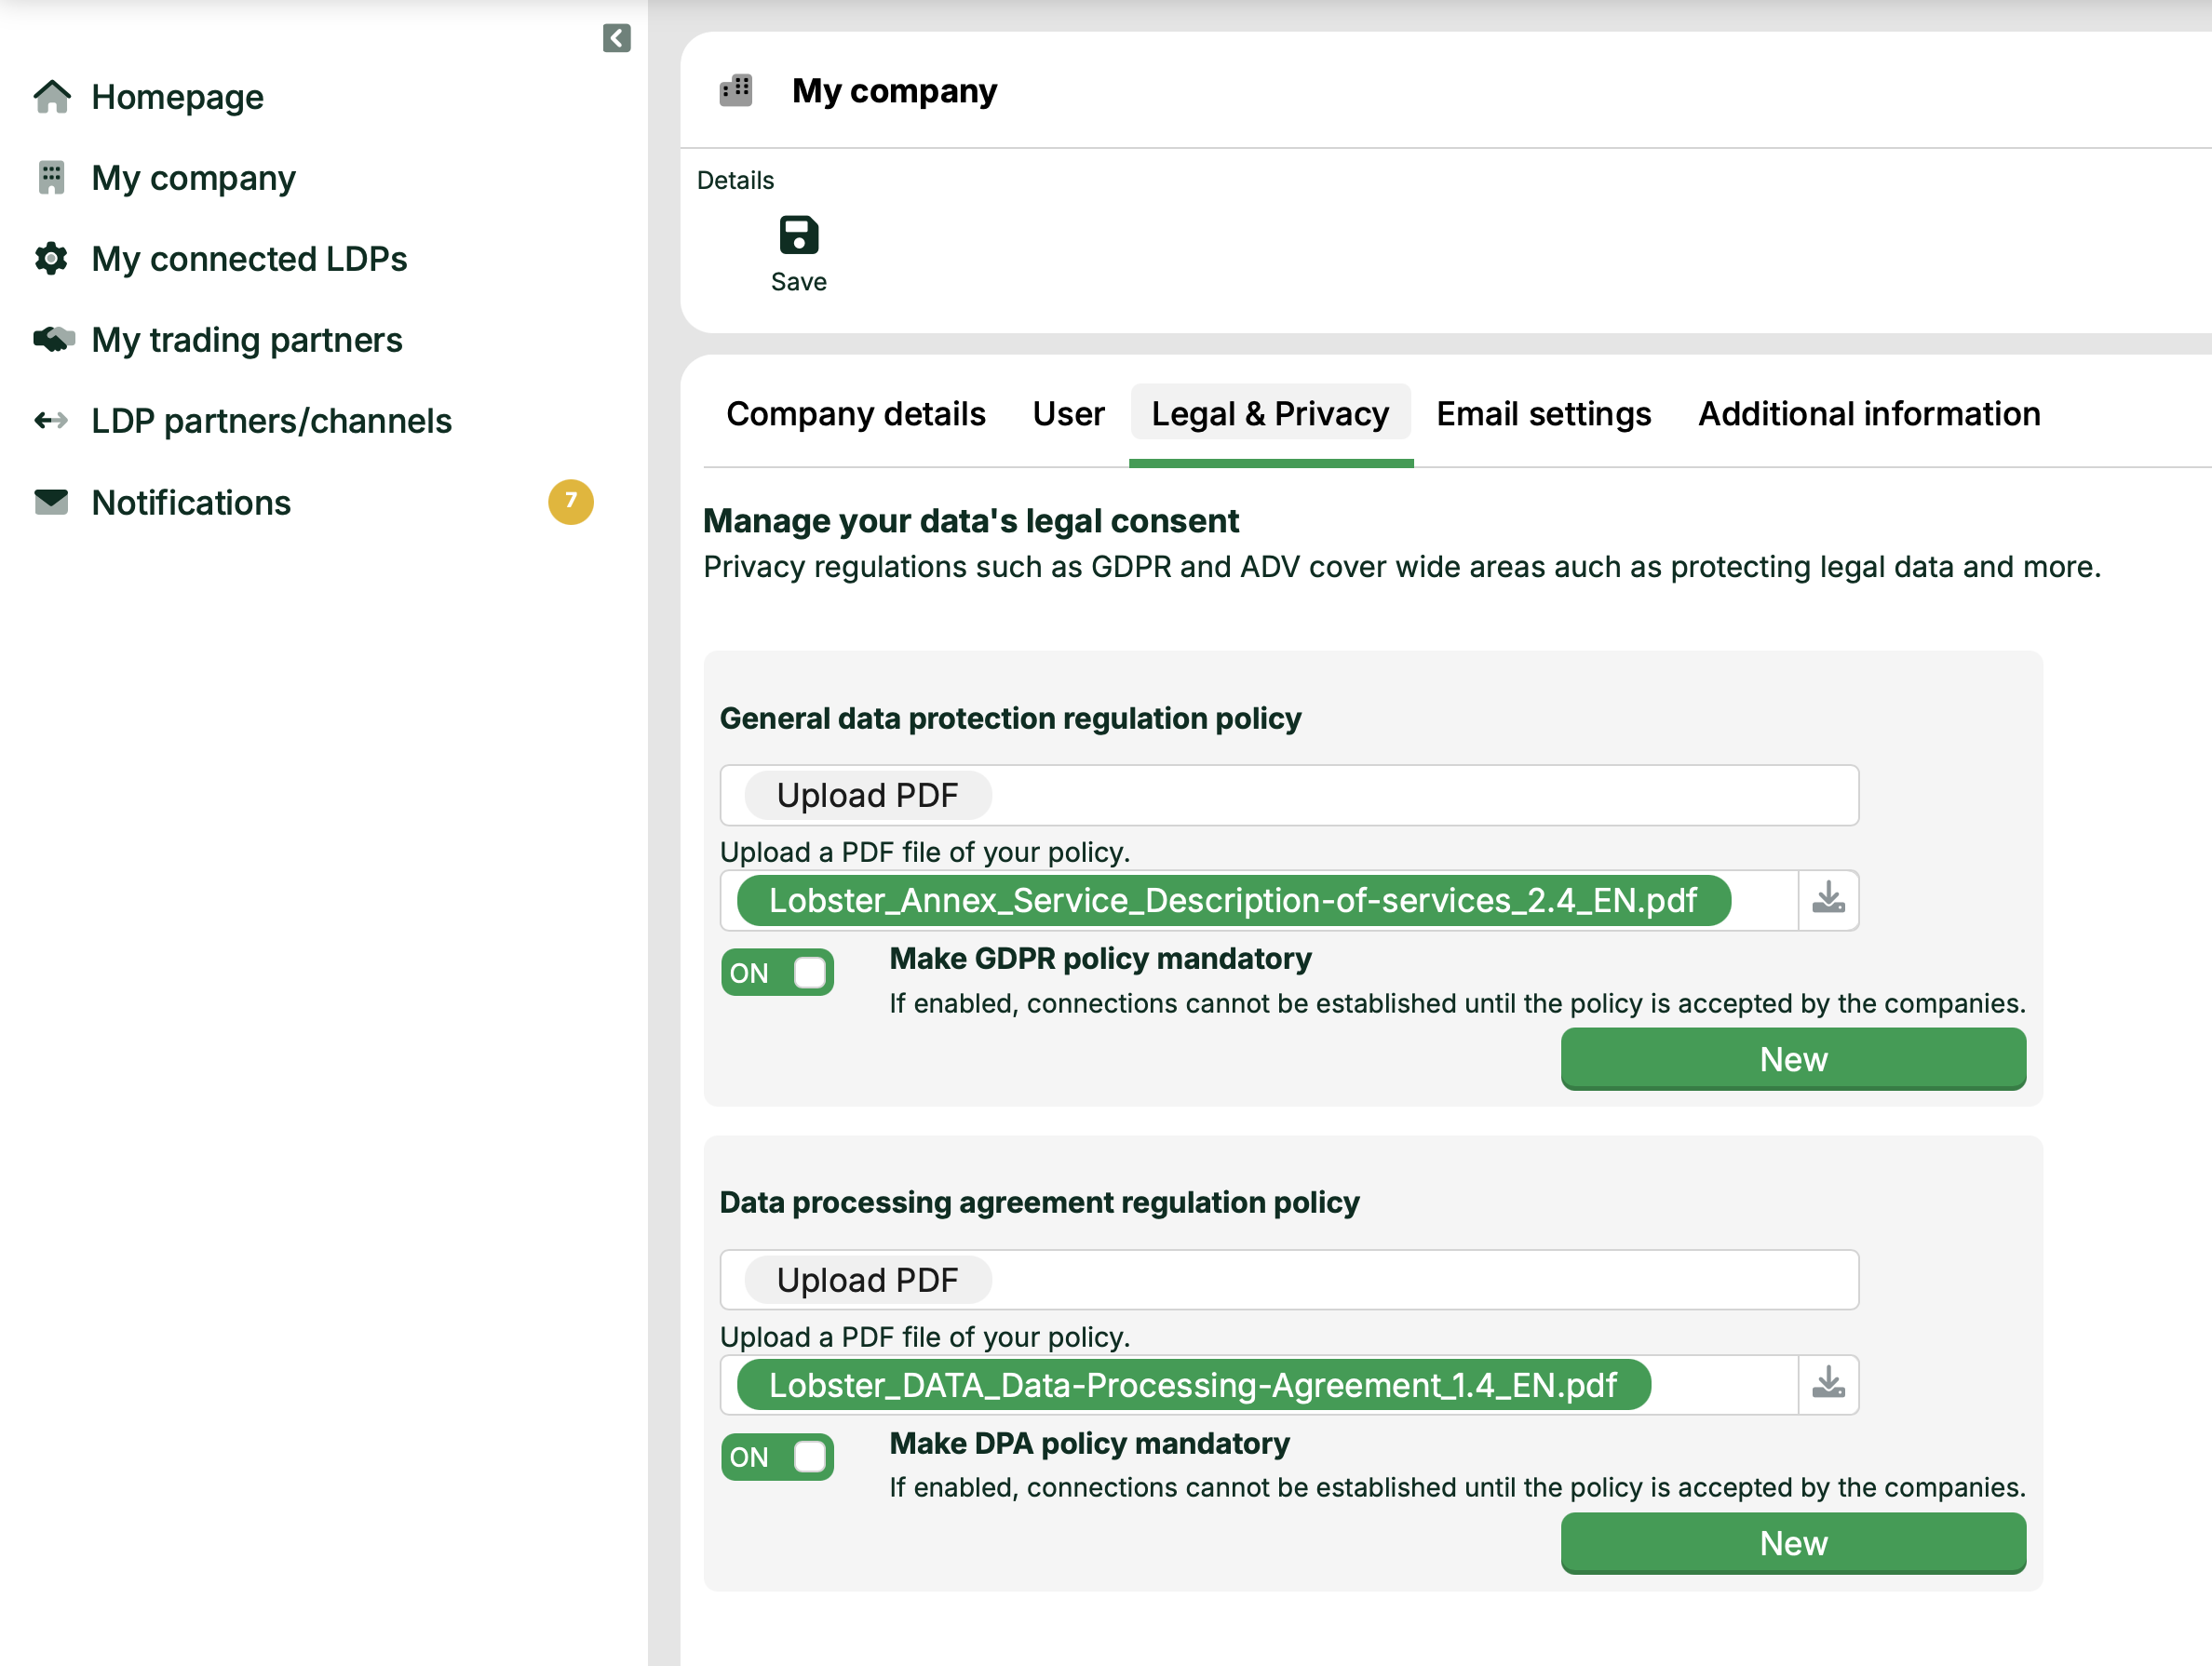
Navigate to My company and then to the Legal & Privacy tab. Here you add your company’s legal documents. Your partners receive these documents for acceptance.
Procedure
Provide your document: via a link, manually, or as an uploaded PDF.
Enable this option to require your partner to accept your document.
Customizing email branding (LDP users)
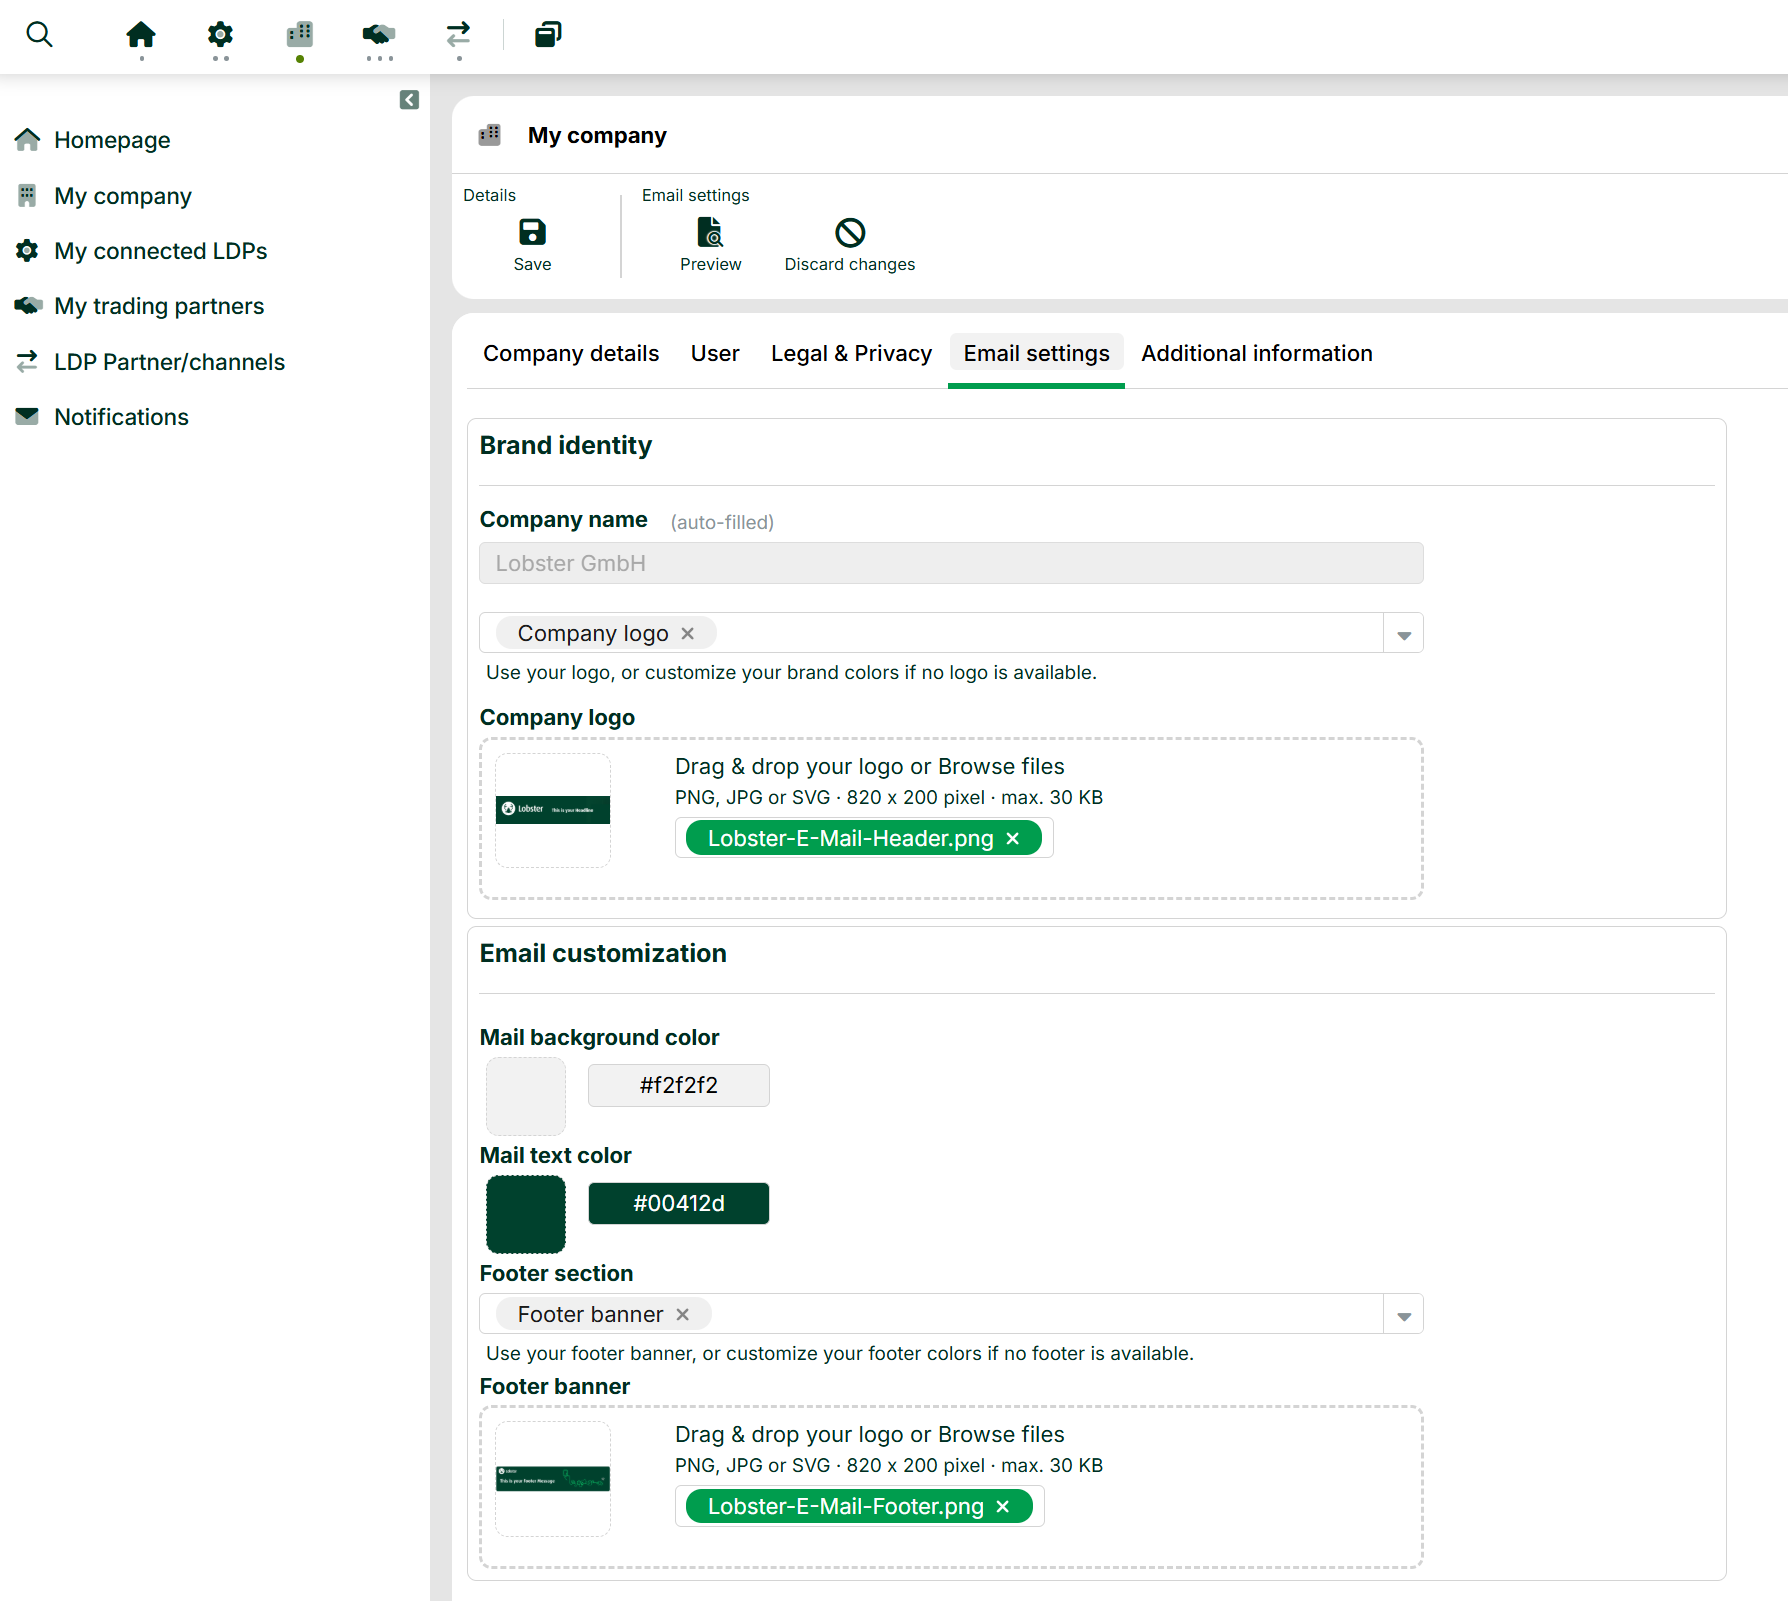
Go to My company and then to the Email settings tab. Here, you can customize the invitation e-mails sent to your partners to match your company's design:
Check company name
Upload your company logo or customize your brand colors
Set the background color (hex value or color picker)
Set text color
Optional: Upload a footer banner
Image specifications for the logo and footer banner
The same guidelines apply to company logos and footer banners:
Recommended image size: 820 x 200 pixels. The image does not have to fill the entire area – position it within the image area (see the example below).
Supported formats: JPG, JPEG, PNG, GIF, BMP, TIF, WEBP, and SVG.
File size: No more than 30 KB, ideally less than 10 KB. Smaller files load faster, improve the e-mail's appearance, and decrease the risk of them being blocked by spam filters.
Example:

The Trading Partner Manager checks each file before it is uploaded. If the format is unsupported or the file is too large, it displays a clear error message.
Result
The Trading Partner Manager uses this information in the invitation emails sent to your partners. Use the Preview button on the ribbon to review your changes before saving. Click Save to apply the changes, or click Discard changes to revert them back.
Define additional information (LDP users)
As a customer administrator, you define your own additional information that your partners provide when setting up a Channel. The Trading Partner Manager verifies the values and then transfers them as additional identifiers to the corresponding channel on the Lobster Data Platform.
Procedure
Go to My company and open the Additional information tab.
NOTE: The Additional information tab is visible only to users with the "Customer administrator" role.On the ribbon, under Additional information, click Add field. The Add new field dialog box opens.
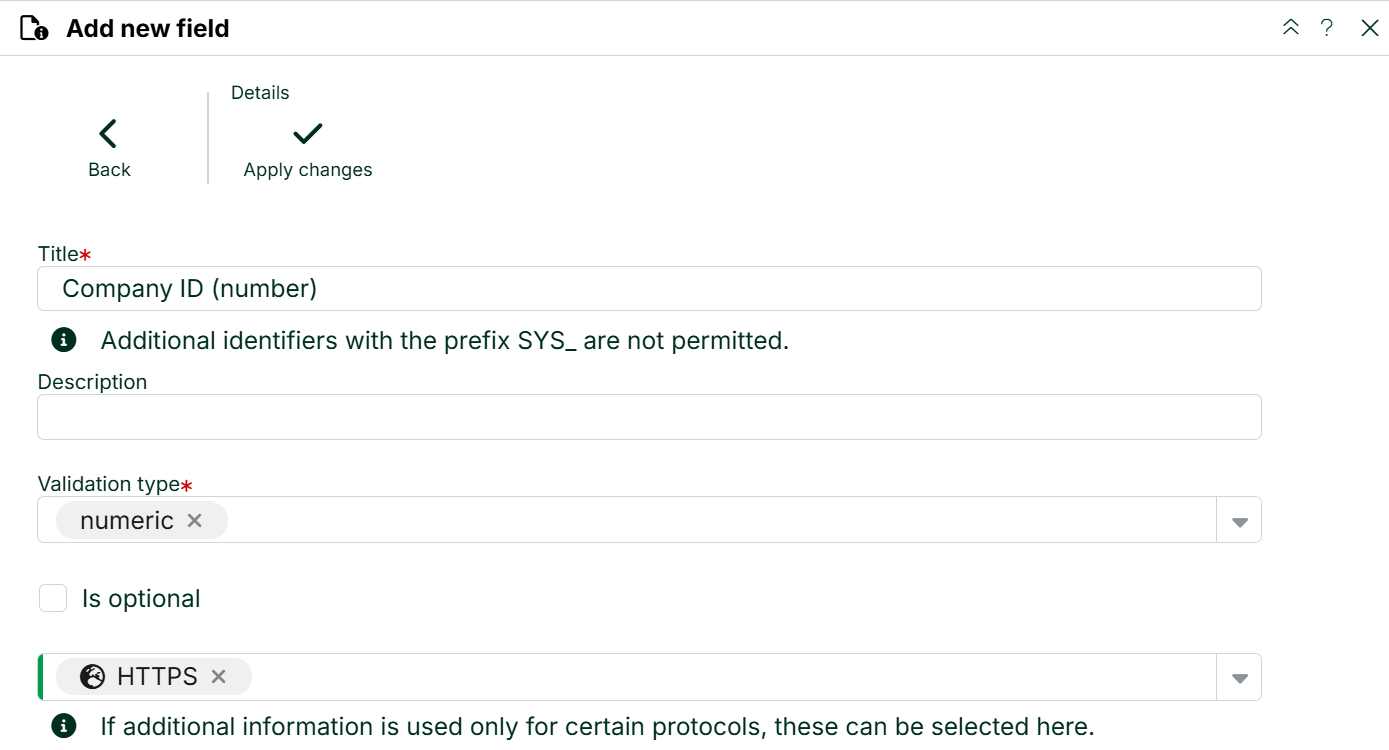
Enter a name in the Title field (required). NOTE: Identifiers with the prefix SYS_ are not allowed. This prefix is reserved for internal use by the Lobster Data Platform.
Optional: Enter a description in the Description field.
Under Validation type, select the validation rule: alphanumeric, EU VAT number, GLN, numeric, regular expression.
For regular expressions: Enter the regular expression in the Regular expression field (required field).
A field is required by default. Select Is optional if you want to allow the partner to leave it blank.
From the log dropdown menu, select the log types for which you want to request additional information. You can select one or more types, or select All.
Click Apply changes and then click Save on the ribbon.
Result
The Trading Partner Manager saves the definitions. As soon as a partner enters values, the Trading Partner Manager checks them based on the validation type and transfers them to the additional identifiers section of the channel. Invalid values are not saved; if a required field is left blank, the process cannot be completed.
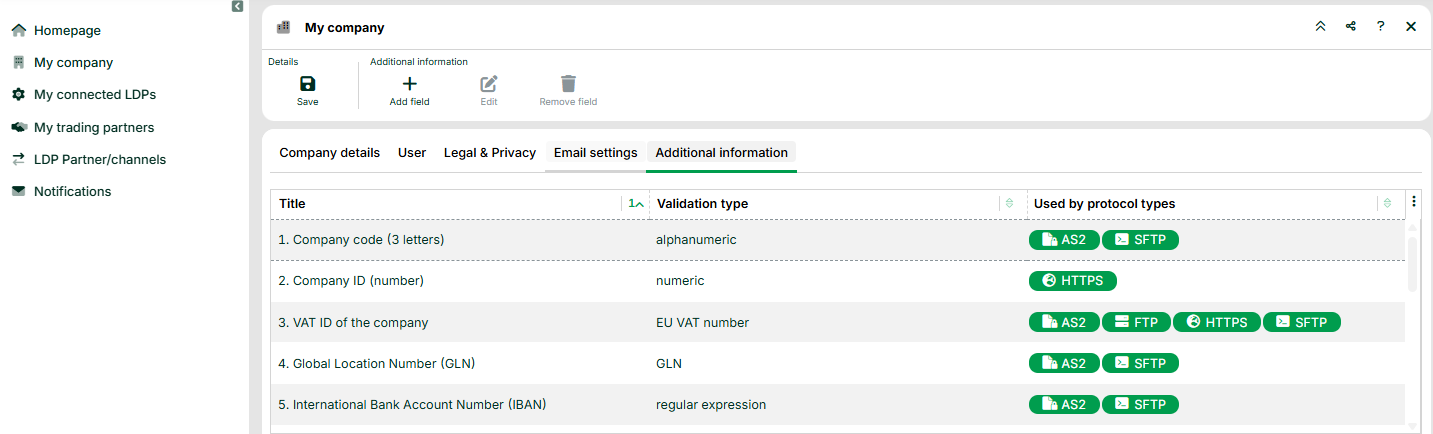
NOTE:
If you delete additional information about Remove field, the Trading Partner Manager will remove this information, after confirmation, from the Additional IDs (central) of the Lobster Data Platform and from all channels managed by the Trading Partner Manager for this Lobster Data Platform.
Uploading certificates (LDP user)
Upload all certificates for your partner channels.
Procedure
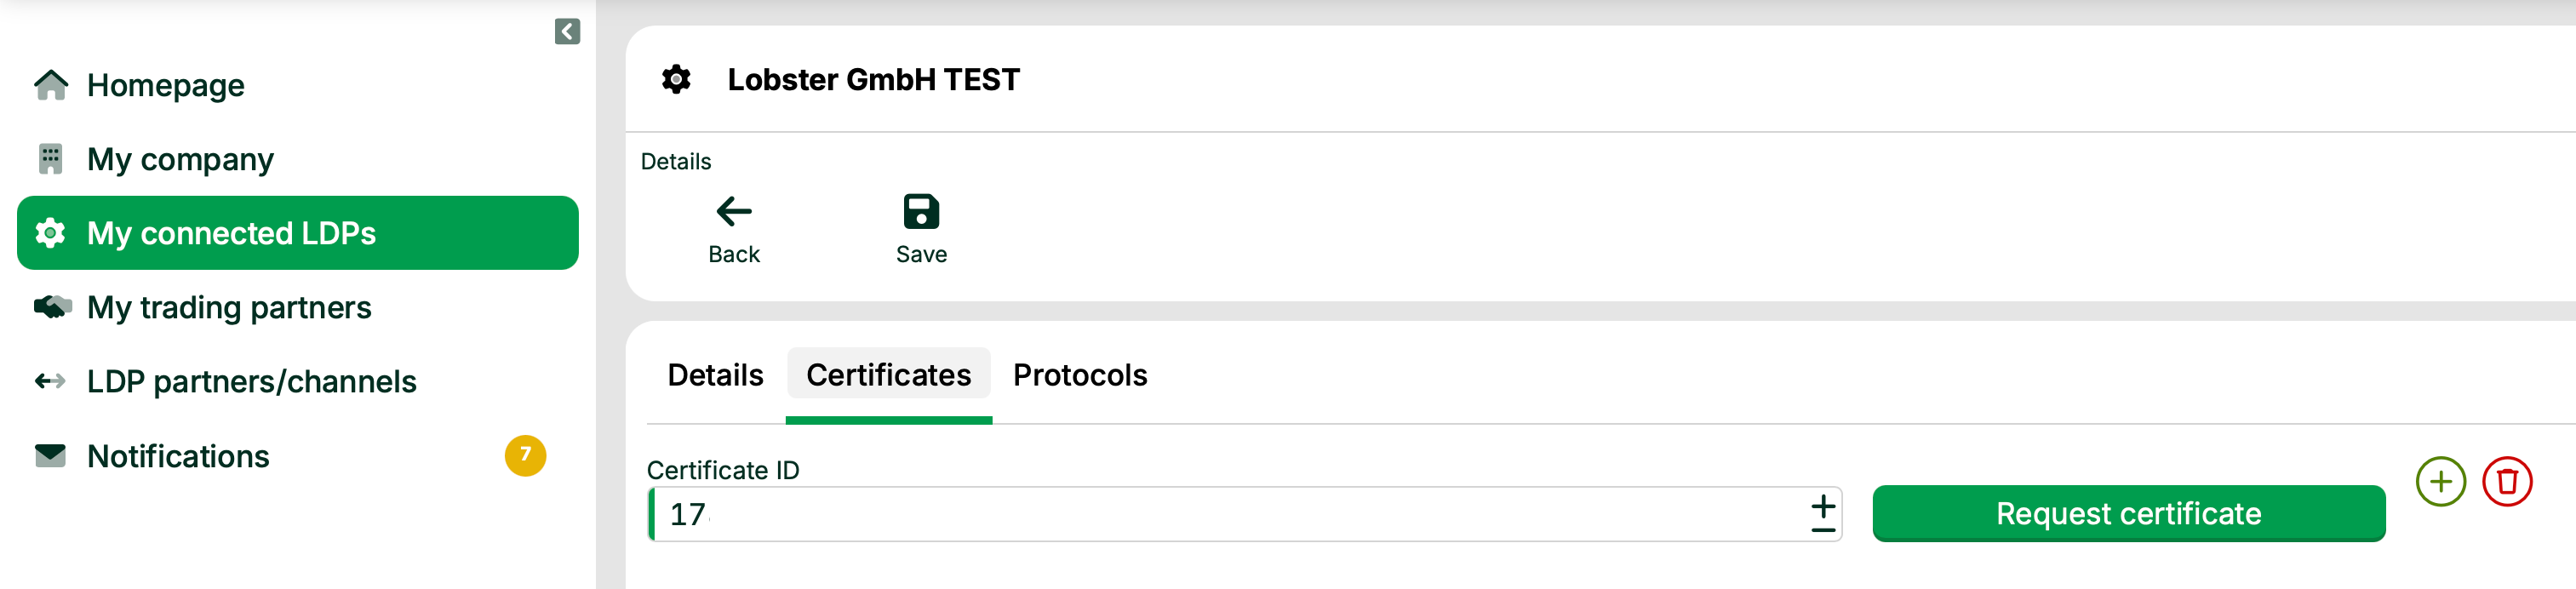
In the details of your registered environment, switch to the Certificates tab.
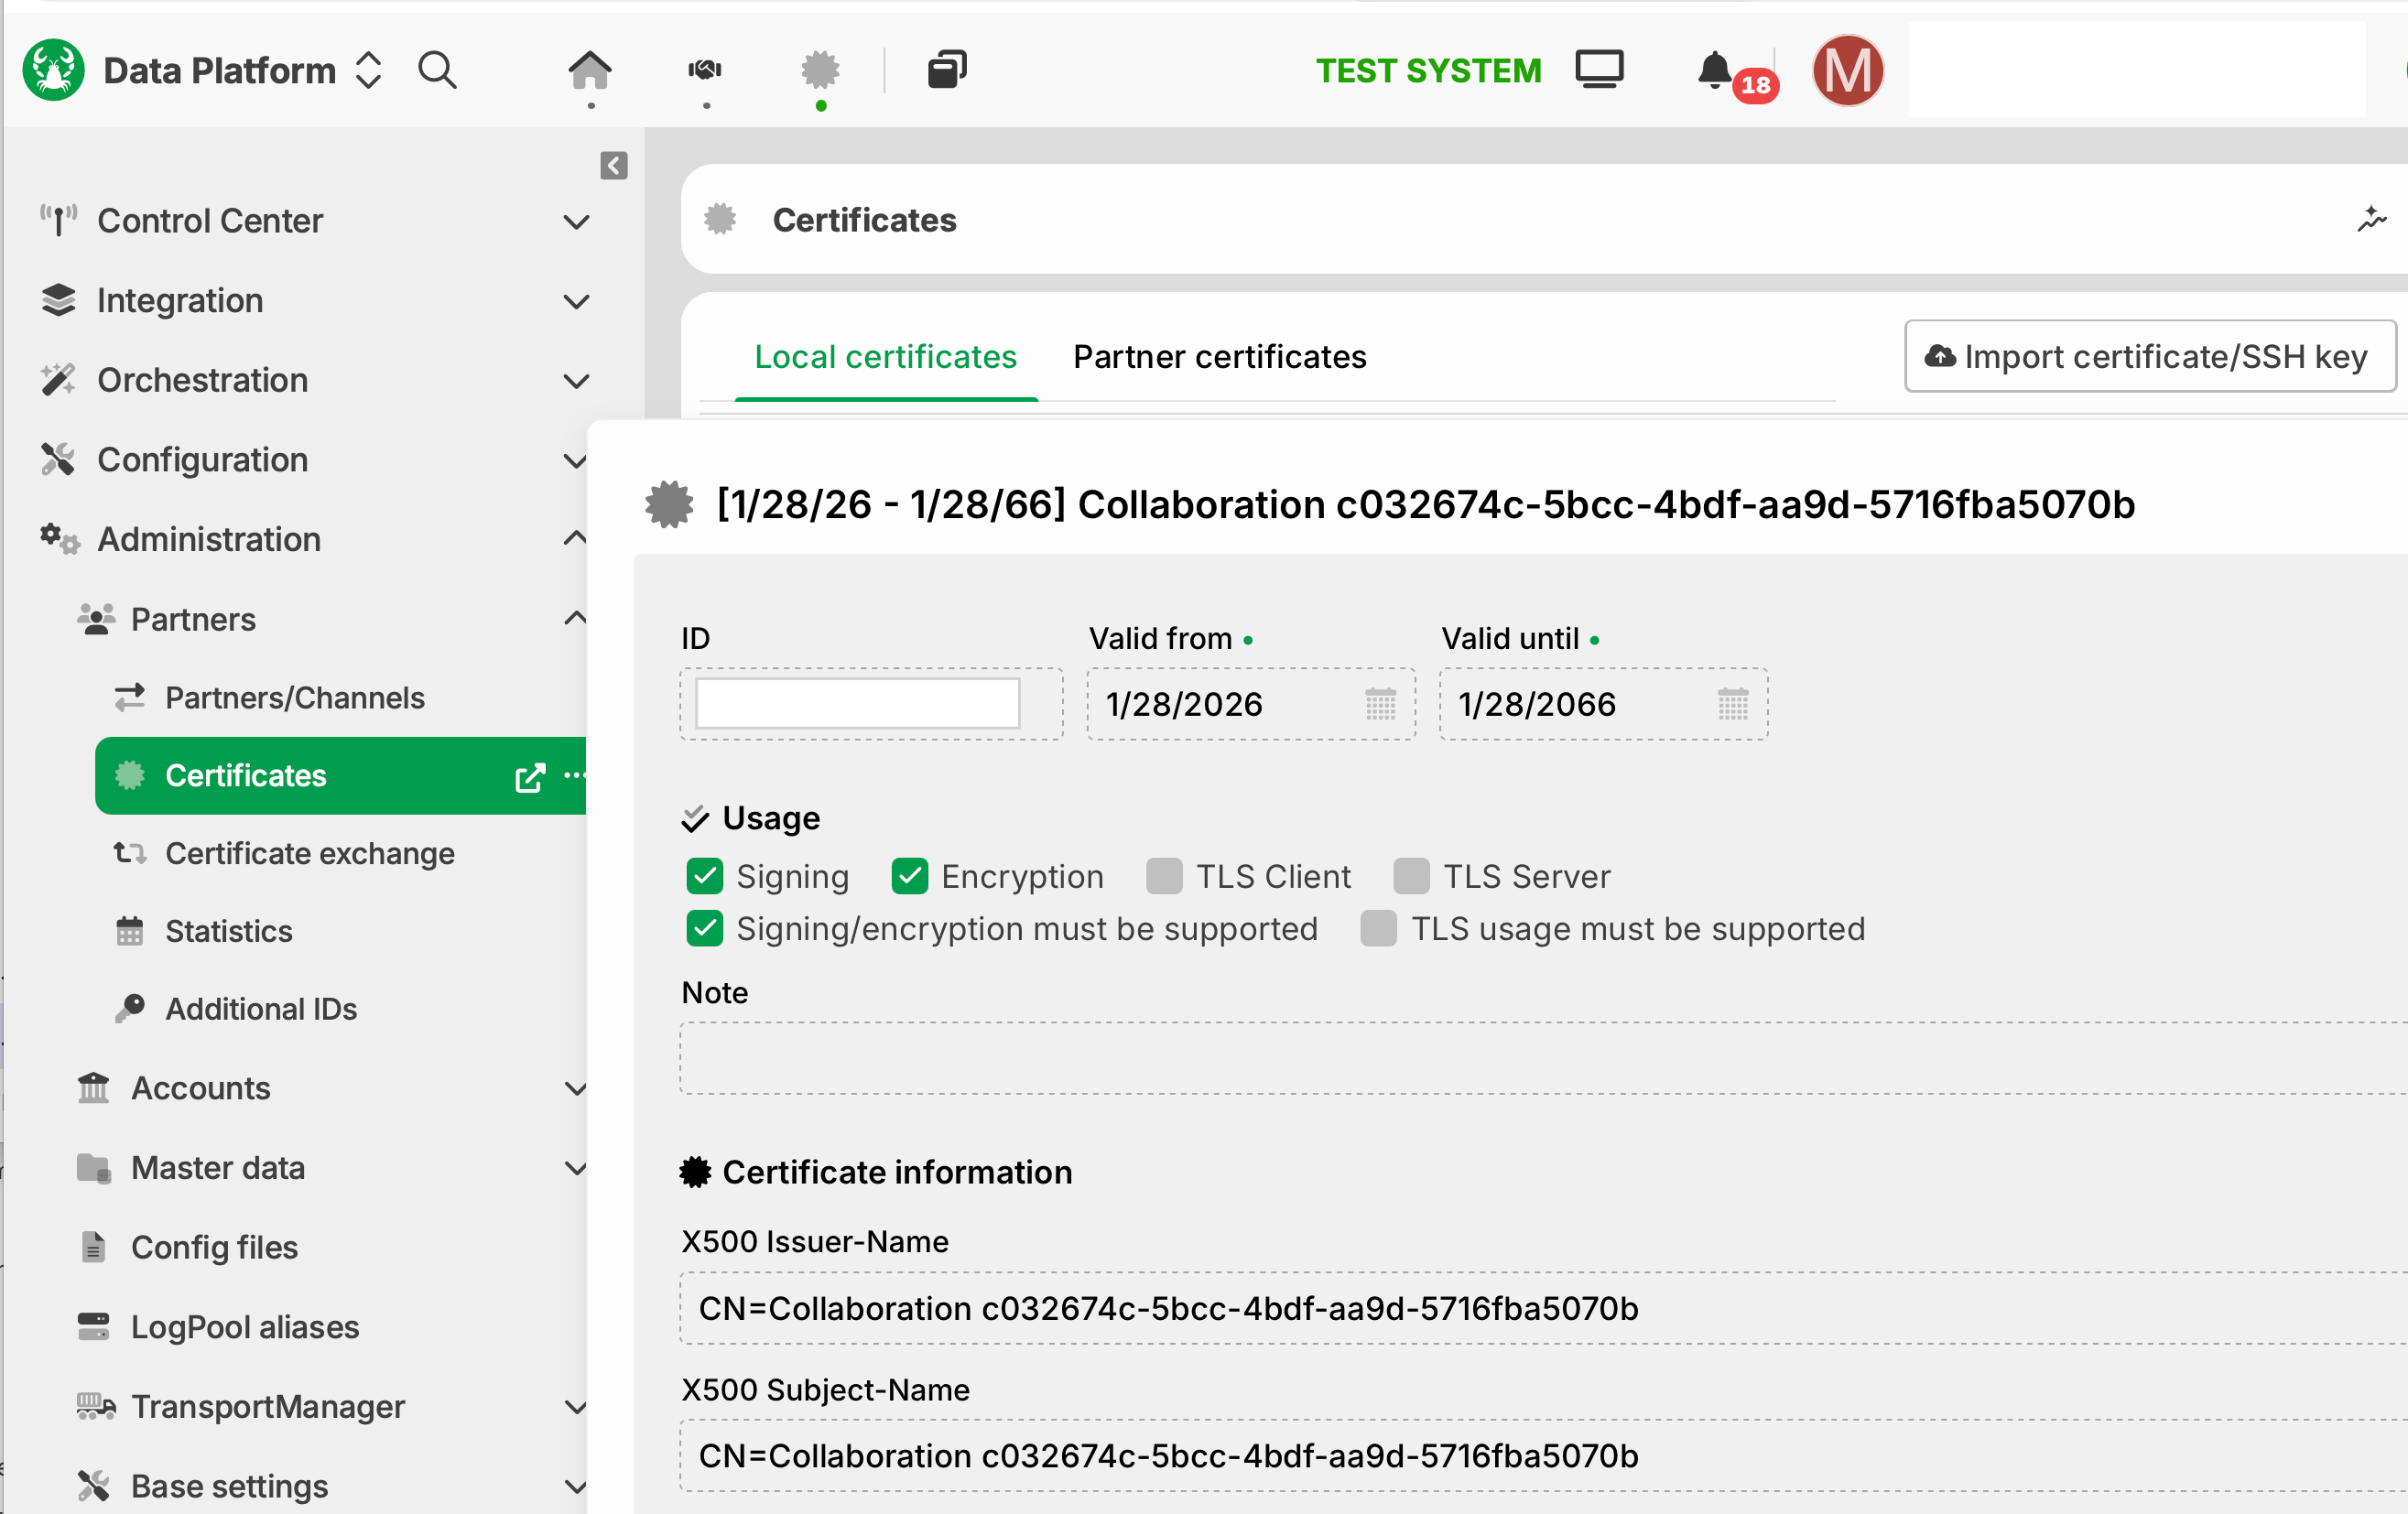
Determine the ID of the certificate. To do so, navigate on the Lobster Data Platform to
Administration > Partners > Certificates. Open the certificate and copy the ID.Paste the ID in the Trading Partner Manager under Certificates > Certificate ID.
Click the Request certificate button.
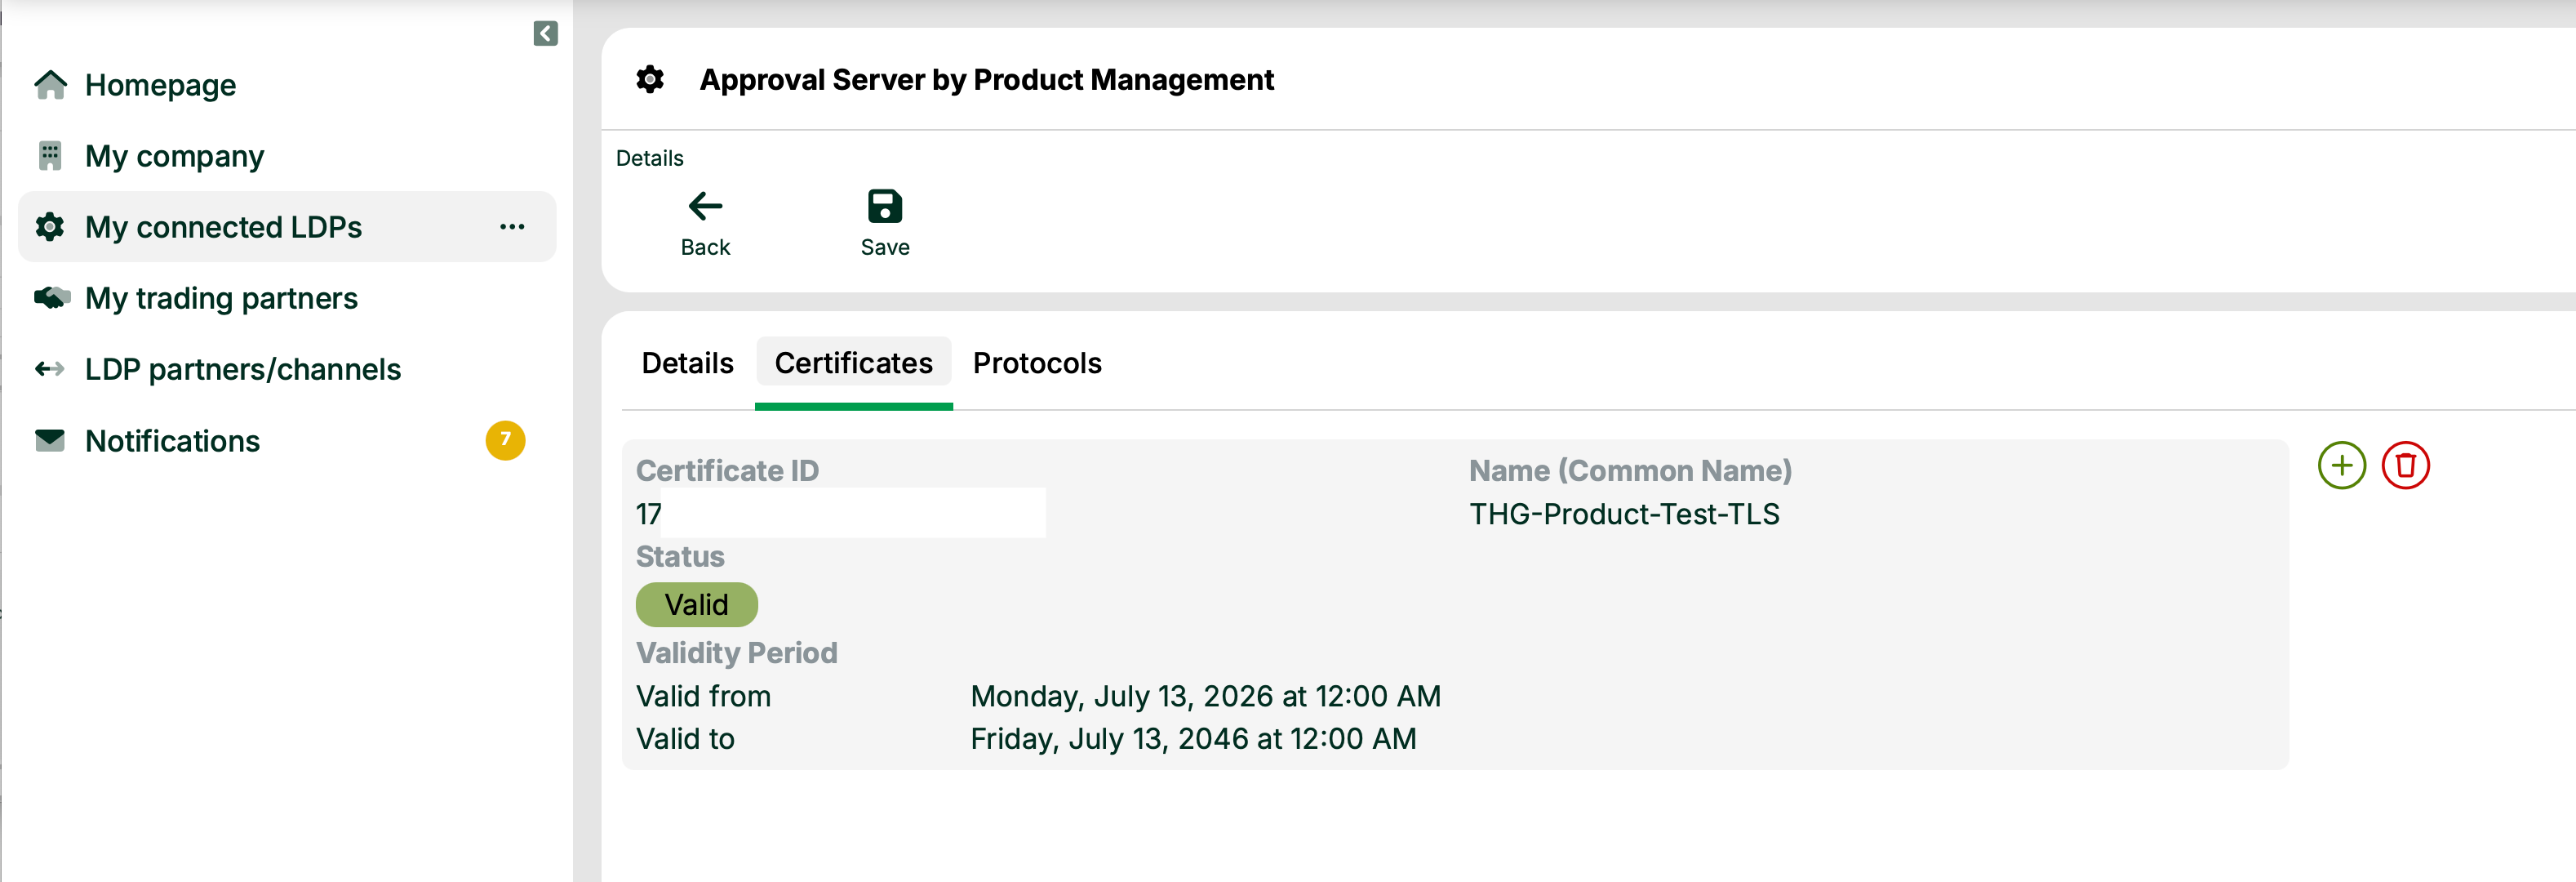
Click Save after the certificate has been successfully validated.
Result
The Trading Partner Manager requests the certificate from the connected Lobster Data Platform. You can add further certificates with the  button.
Setting up protocols (LDP user)
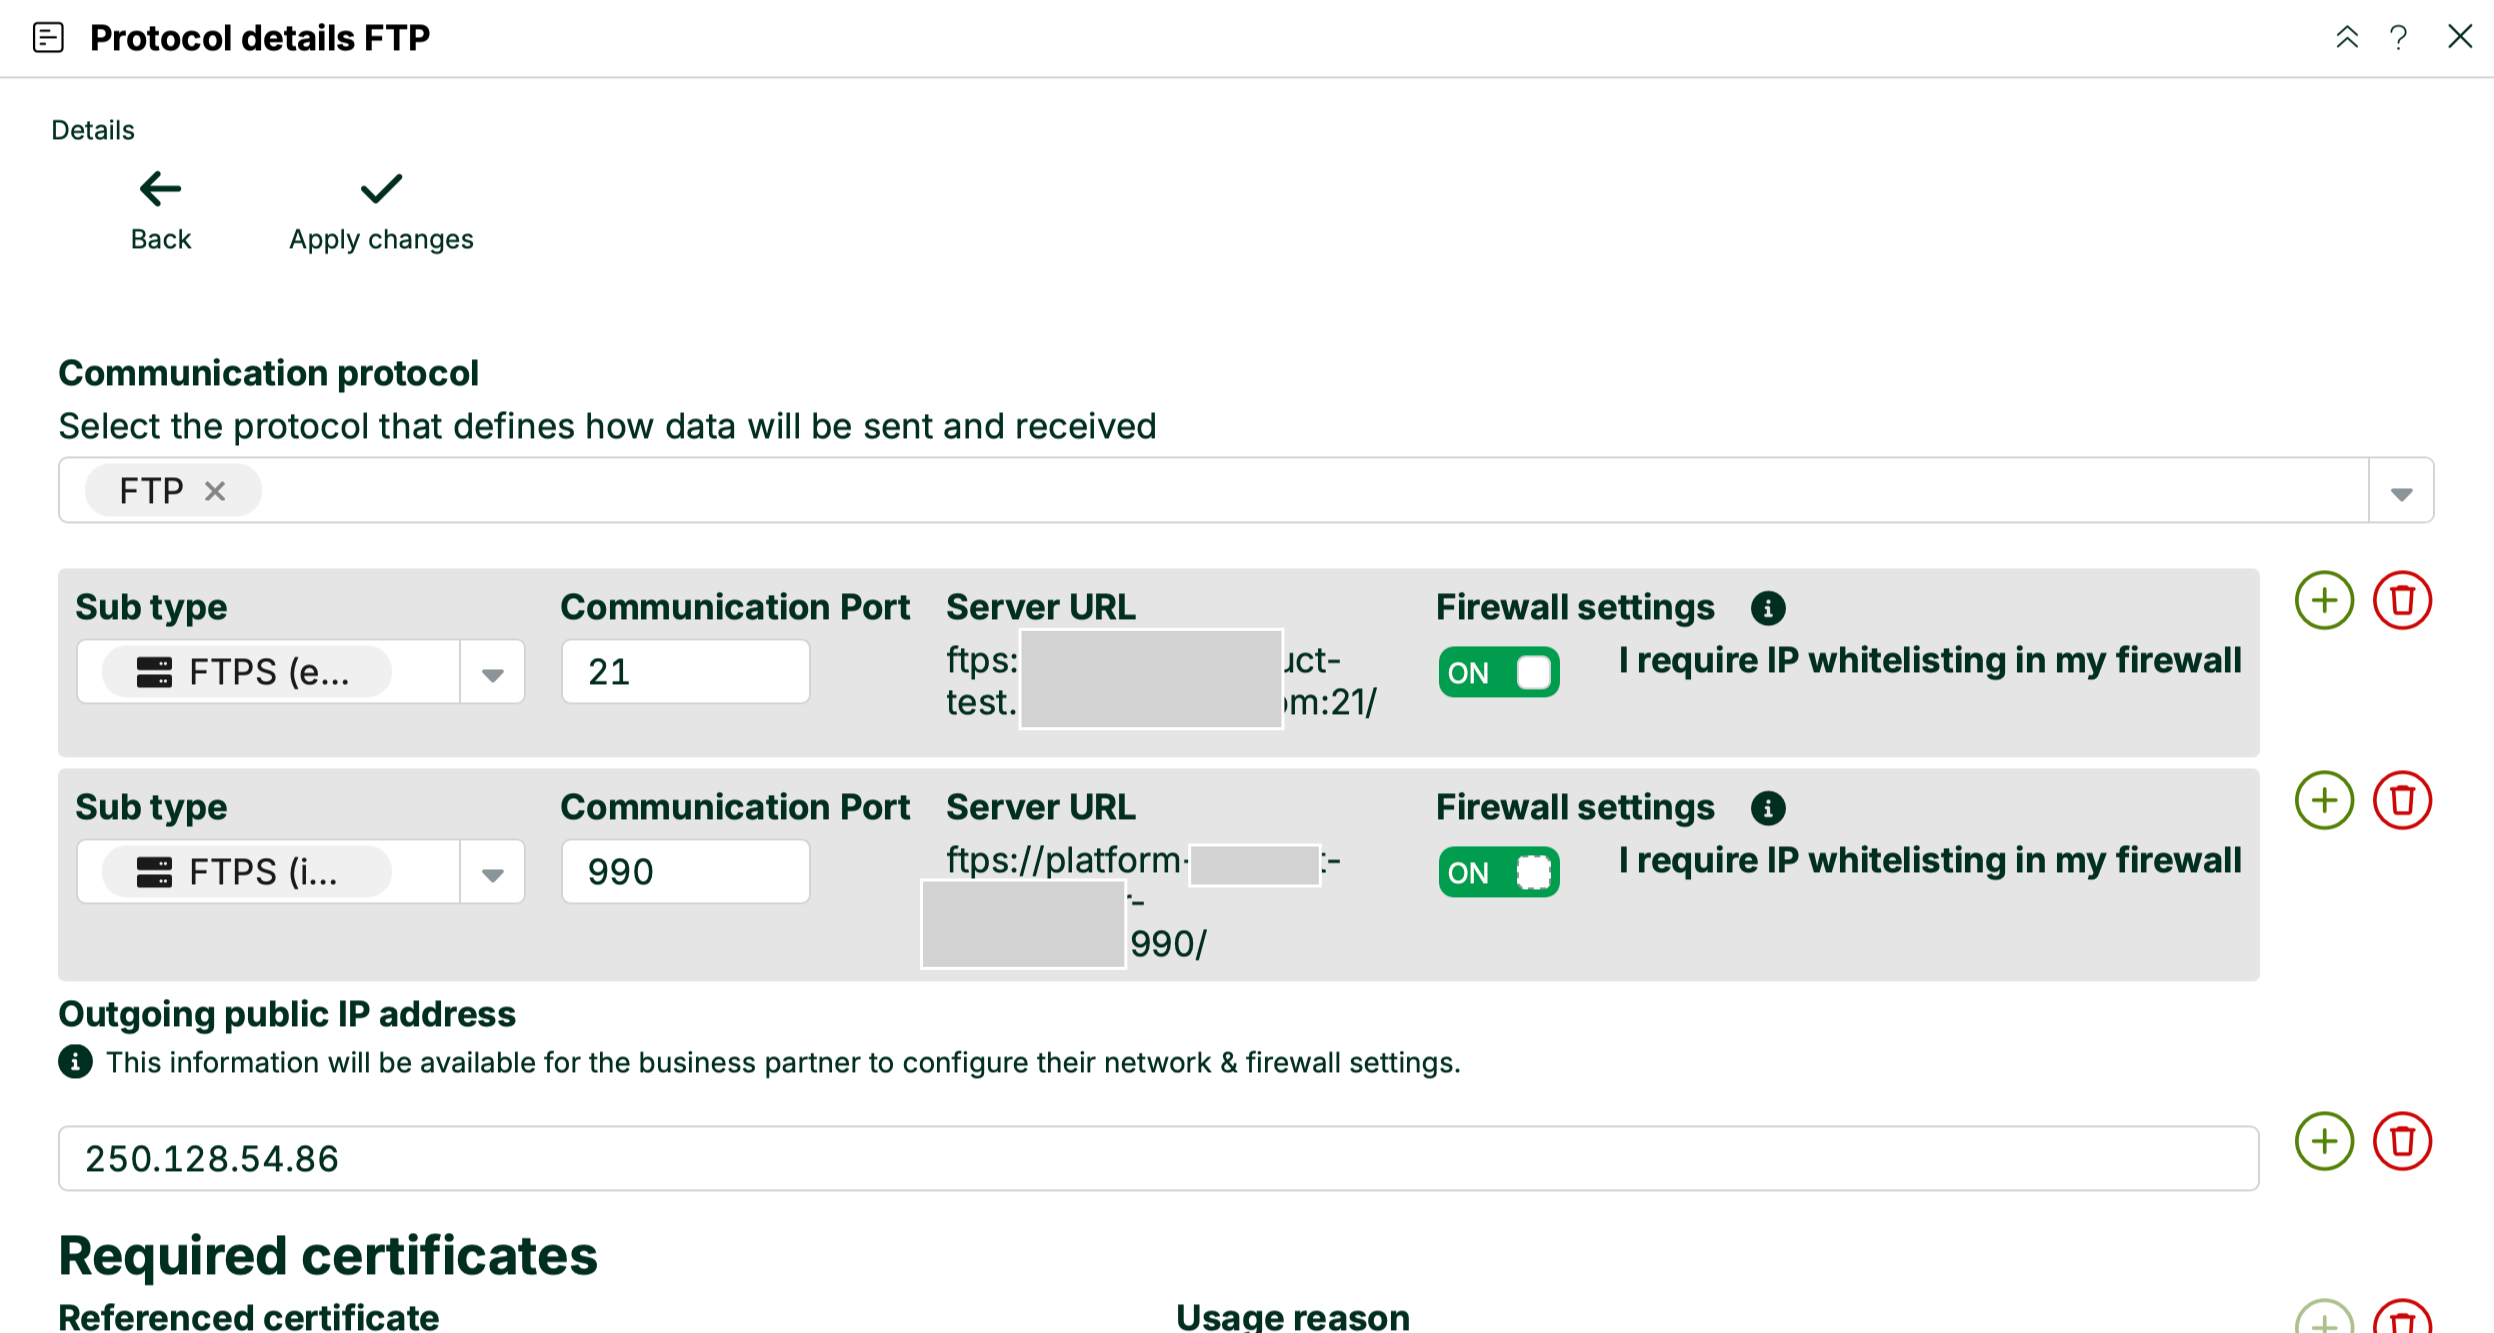
Set up the protocols for your partner channels. Currently, SFTP, AS2, OFTP2, FTPS, and HTTPS are available. The following example shows FTPS.
NOTE: FTPS is available as of Lobster Data Platform version 26.2.0. In the protocol dropdown, choose between FTPS (expl.) and FTPS (impl.). Optionally, set a custom port for FTPS. You cannot create unencrypted FTP in the Trading Partner Manager.
NOTE: HTTPS is available as of Lobster Data Platform version 26.3.0. In the protocol dropdown, select HTTPS. Enter the server URL of your partner. The Trading Partner Manager accepts HTTPS URLs only.
Select one of the following authentication methods:
Password (Basic or Digest): Enter username and password.
OAuth2: The Trading Partner Manager uses the channel ID as the client ID. The client secret derives from the partner password.
OpenID: Enter issuer and audience. Upload the Partner Certificate or enable Fetch Cert so the Trading Partner Manager retrieves it automatically.
NOTE: Optionally, upload a certificate for mutual TLS authentication. You can also define custom HTTP headers.
Procedure
Select the communication protocol. You can also select multiple protocols.
Specify the Data flow direction, just like for channels.
Select the certificate for this channel. Specify the usage purpose, in this case Encryption. You have uploaded multiple certificates to the environment. All of them are available here.
Click Apply changes.
A recommendation applies to AS2: Select bidirectional channels only. For the certificate, select the usage purposes signature, encryption, and TLS together.
Specifying the public IP address
NOTE: For technical reasons, the Server URL field always shows the internal IP address of the LDP system. Some systems are reachable for partners only via a public IP address. In this case, enter this IP address in the Outgoing public IP address field. This information is later available to the partner.
Inviting a partner (LDP user)
After you have completed the setup on your side, invite a partner. The partner continues the setup on their side.
Procedure
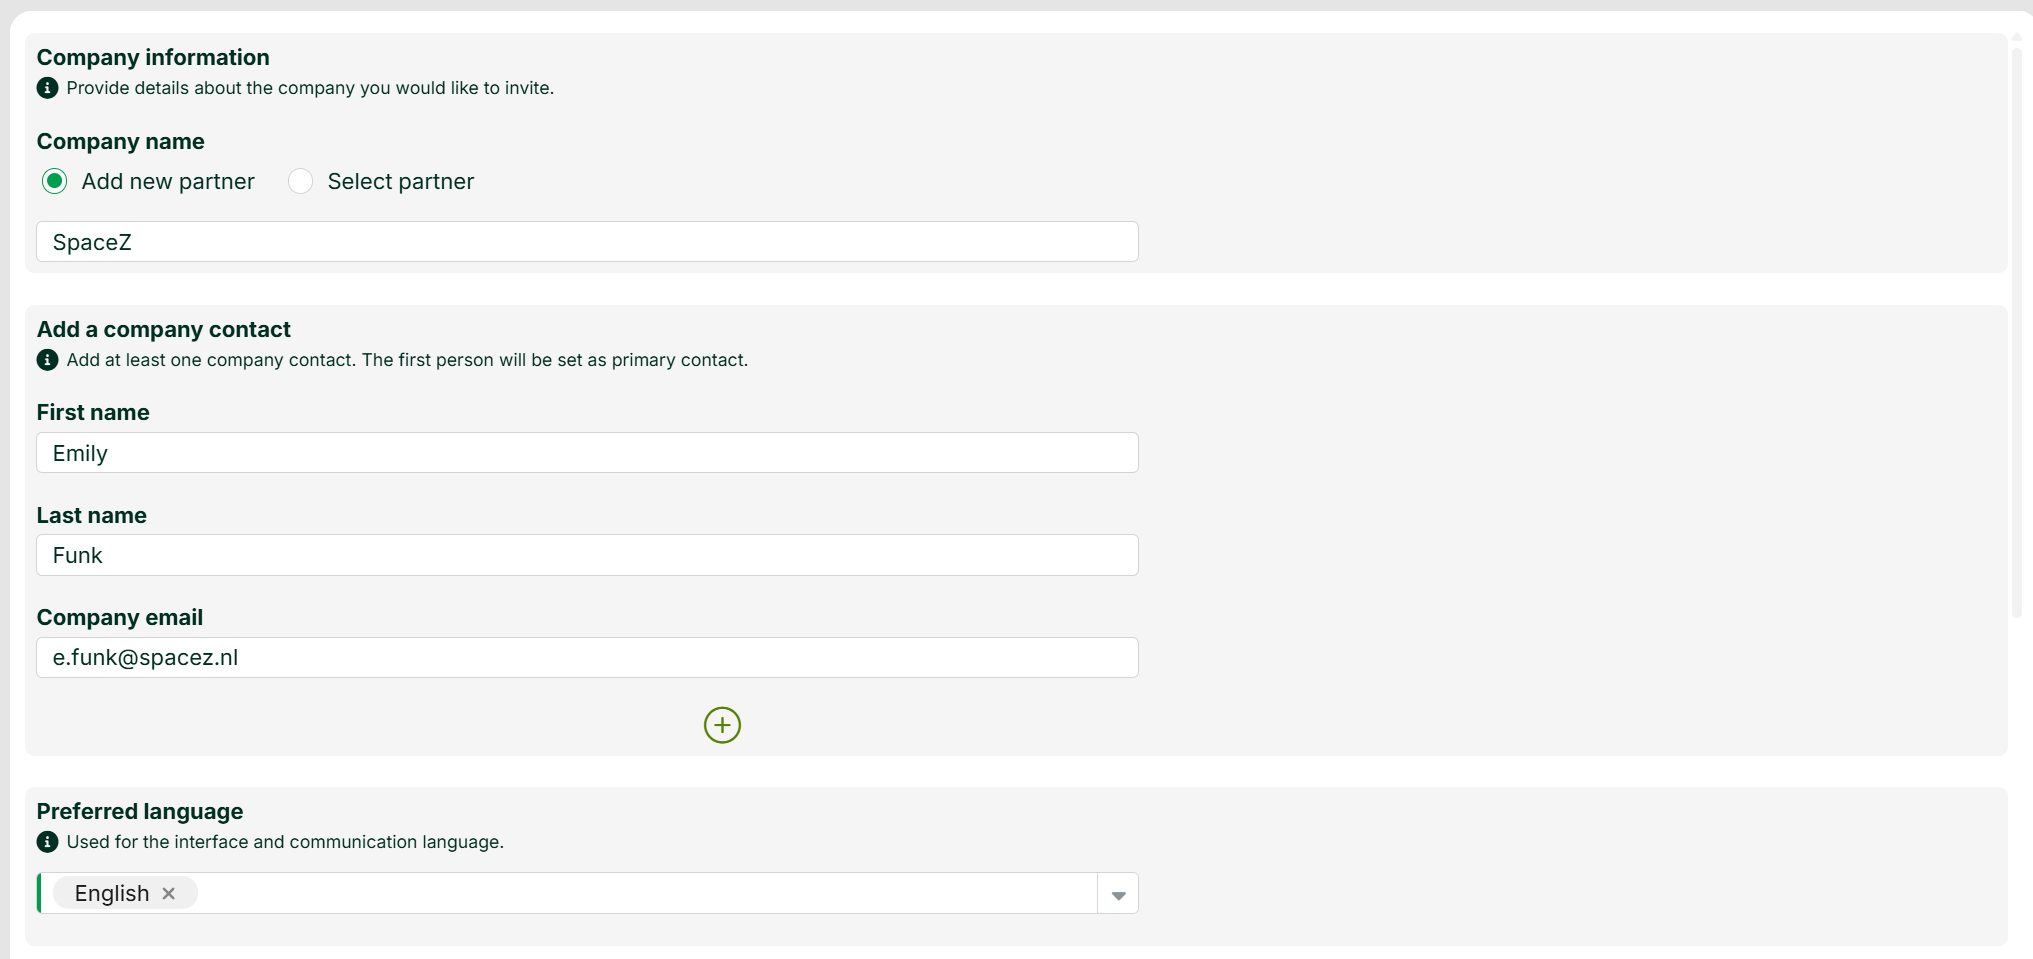
Go to My trading partners and click Add Partner.

Enter the name of your partner company.
Enter the contact information for your partner company. The Trading Partner Manager will send the invitation to this e-mail address.
Optional: Specify your preferred language.
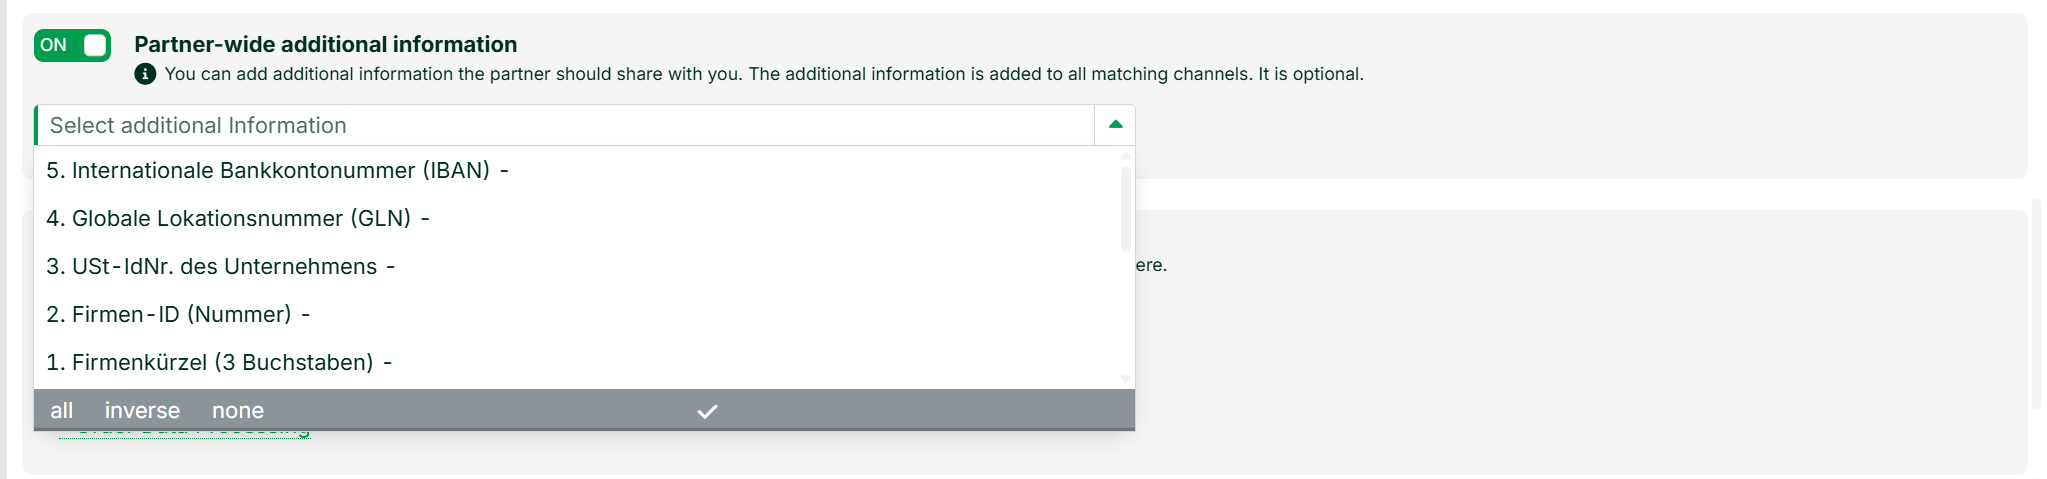
Optional: Select the additional information you previously defined that you would like to request from the partner. This applies to all the partner's channels. See also /v1/docs/manage-tpmregister#zusatzinformationen-definieren-ldpbenutzer.
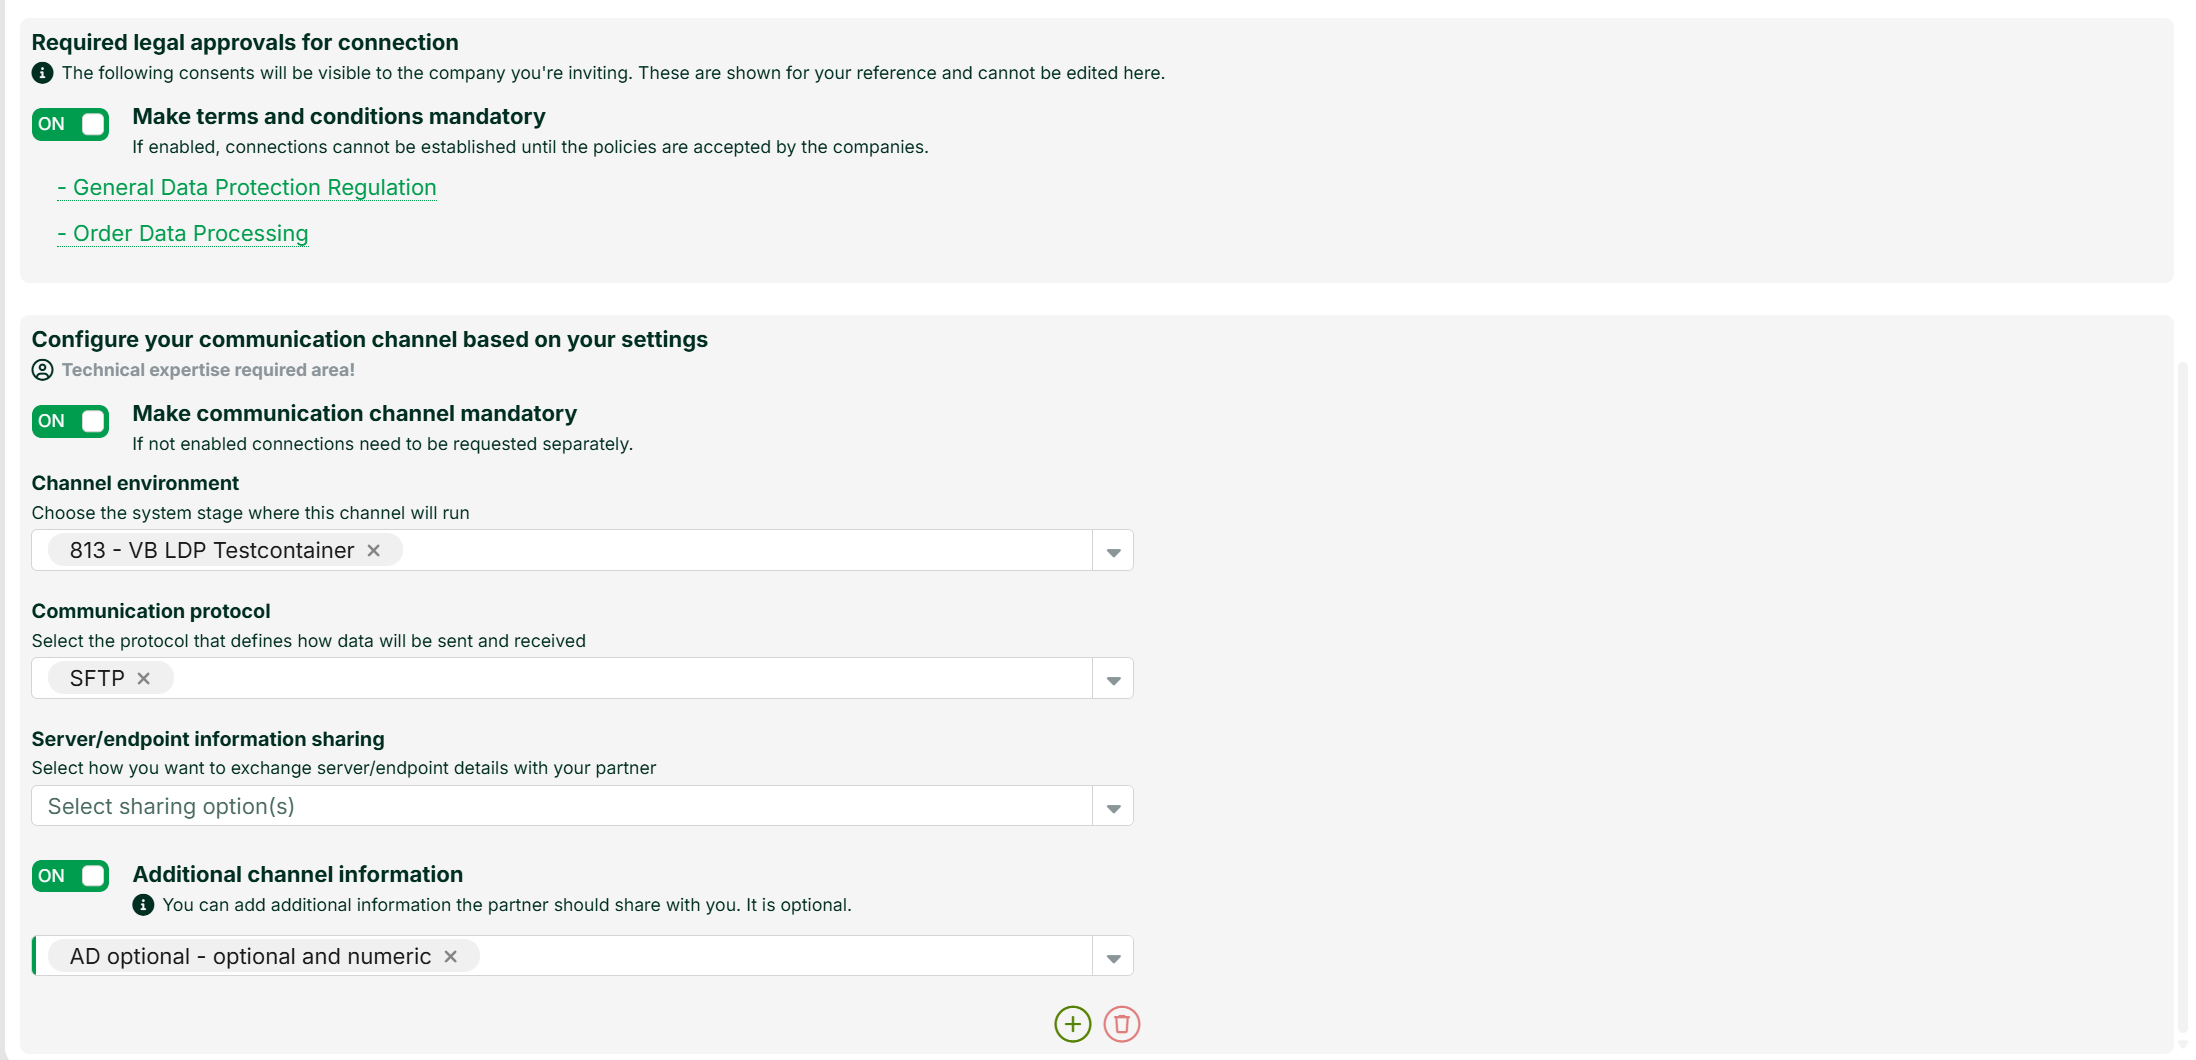
Select your previously registered environment (Lobster Data Platform).
Select the communication protocol, in this case SFTP. You have set up several protocols for this environment. All of them are available here.
Select the data flow direction.
Optional: You can also enable Additional channel information for this channel. At the channel level, you can only select additional information that you have not already requested at the partner level.
Use the Preview option in the ribbon to check how the invitation email looks. Verify the company name, logo, colors, and footer.
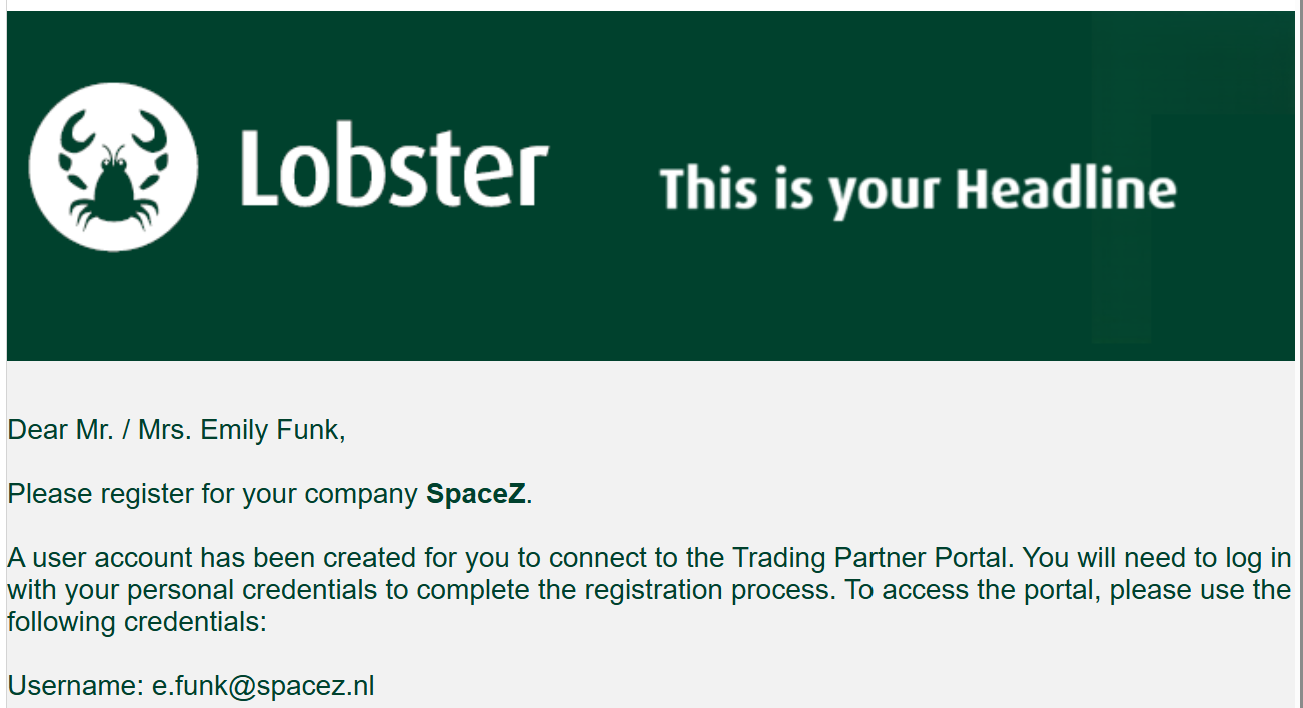
Press Back to exit the preview.
Click the Save button on the ribbon. The Send connection button is now enabled in the ribbon.
Click the Send connection button.
Result
Ihr Partner erhält die Einladung anschließend per E-Mail.
Enter additional information in the channel (LDP users)
For a partner who has already been invited, enter the values for the requested additional information during channel configuration. The partner can enter any values not available to you themselves.
Procedure
Go to My trading partners and open the partner you previously invited.
Add a channel or open the channel you want to configure.
In the Additional Channel Information section, enter the values for the requested additional information.
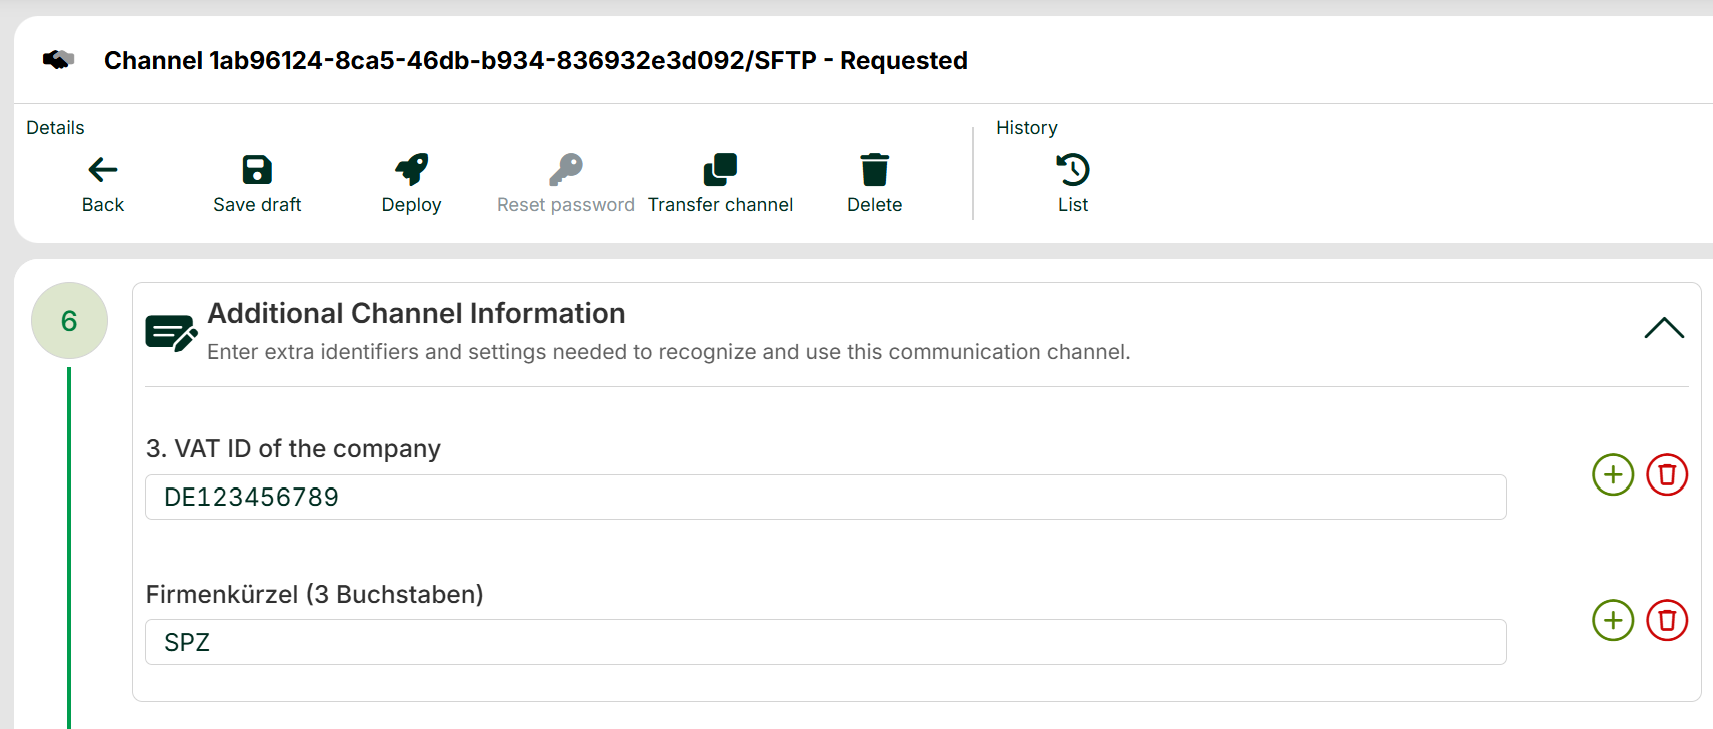
Click Deploy.
Result
The Trading Partner Manager imports the values into the channel. Any additional information you did not fill in can be entered by your partner using the same fields in their channel configuration. See also /v1/docs/manage-tpmregister#zusatzinformationen-im-kanal-eingeben-ldpbenutzer.
Accepting the invitation (partner)
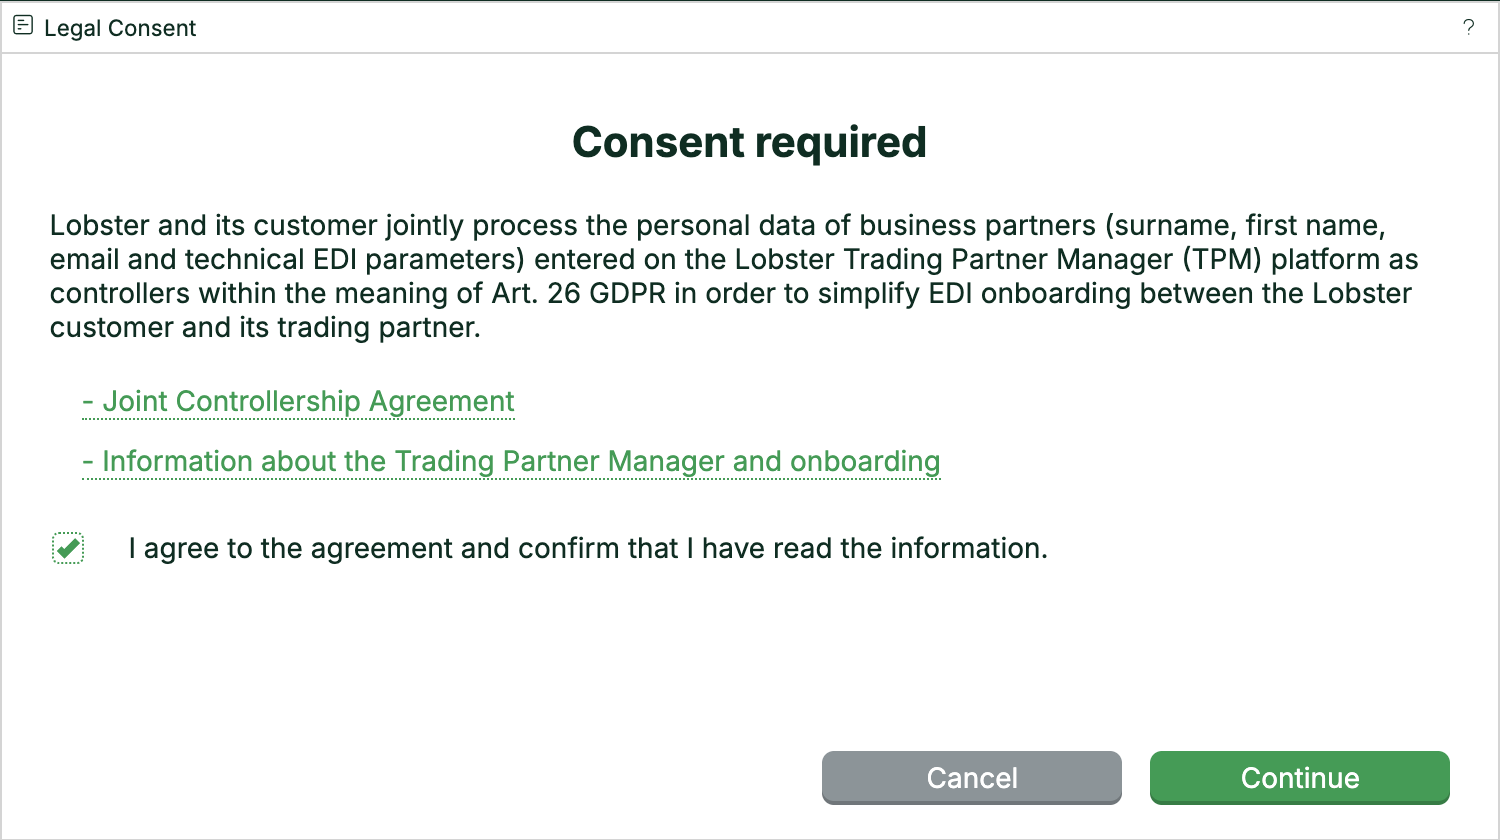
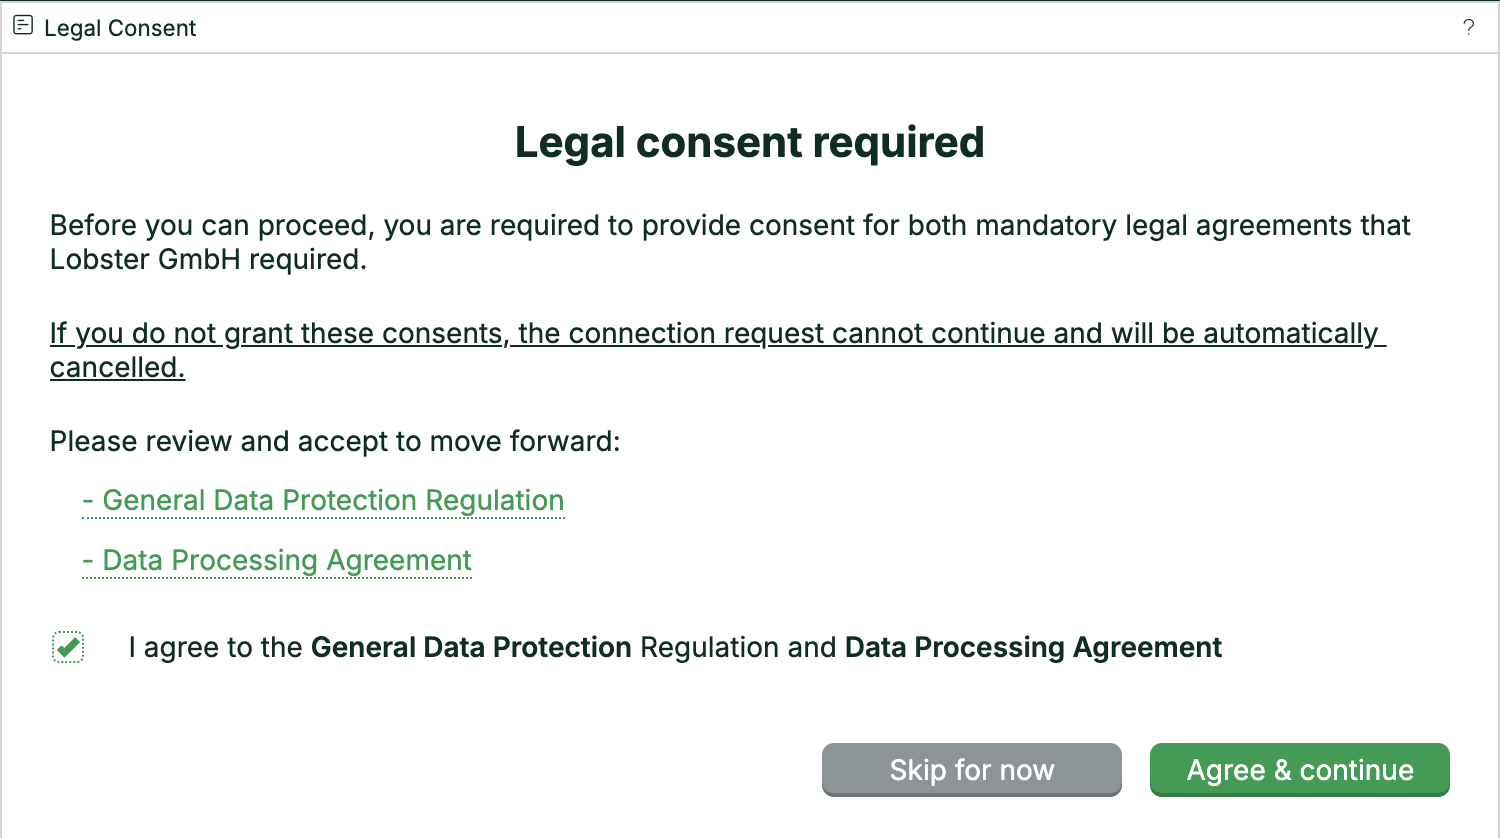
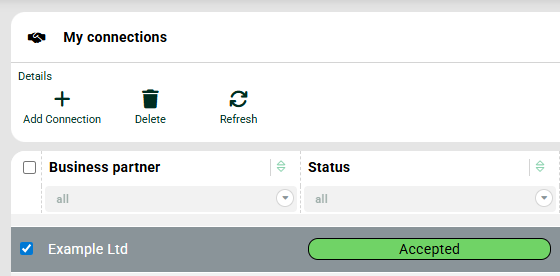
As a partner, you receive the invitation email. Create an account and accept the legal documents. The connection status then changes from Pending approval to Accepted.
Entering channel details (partner)
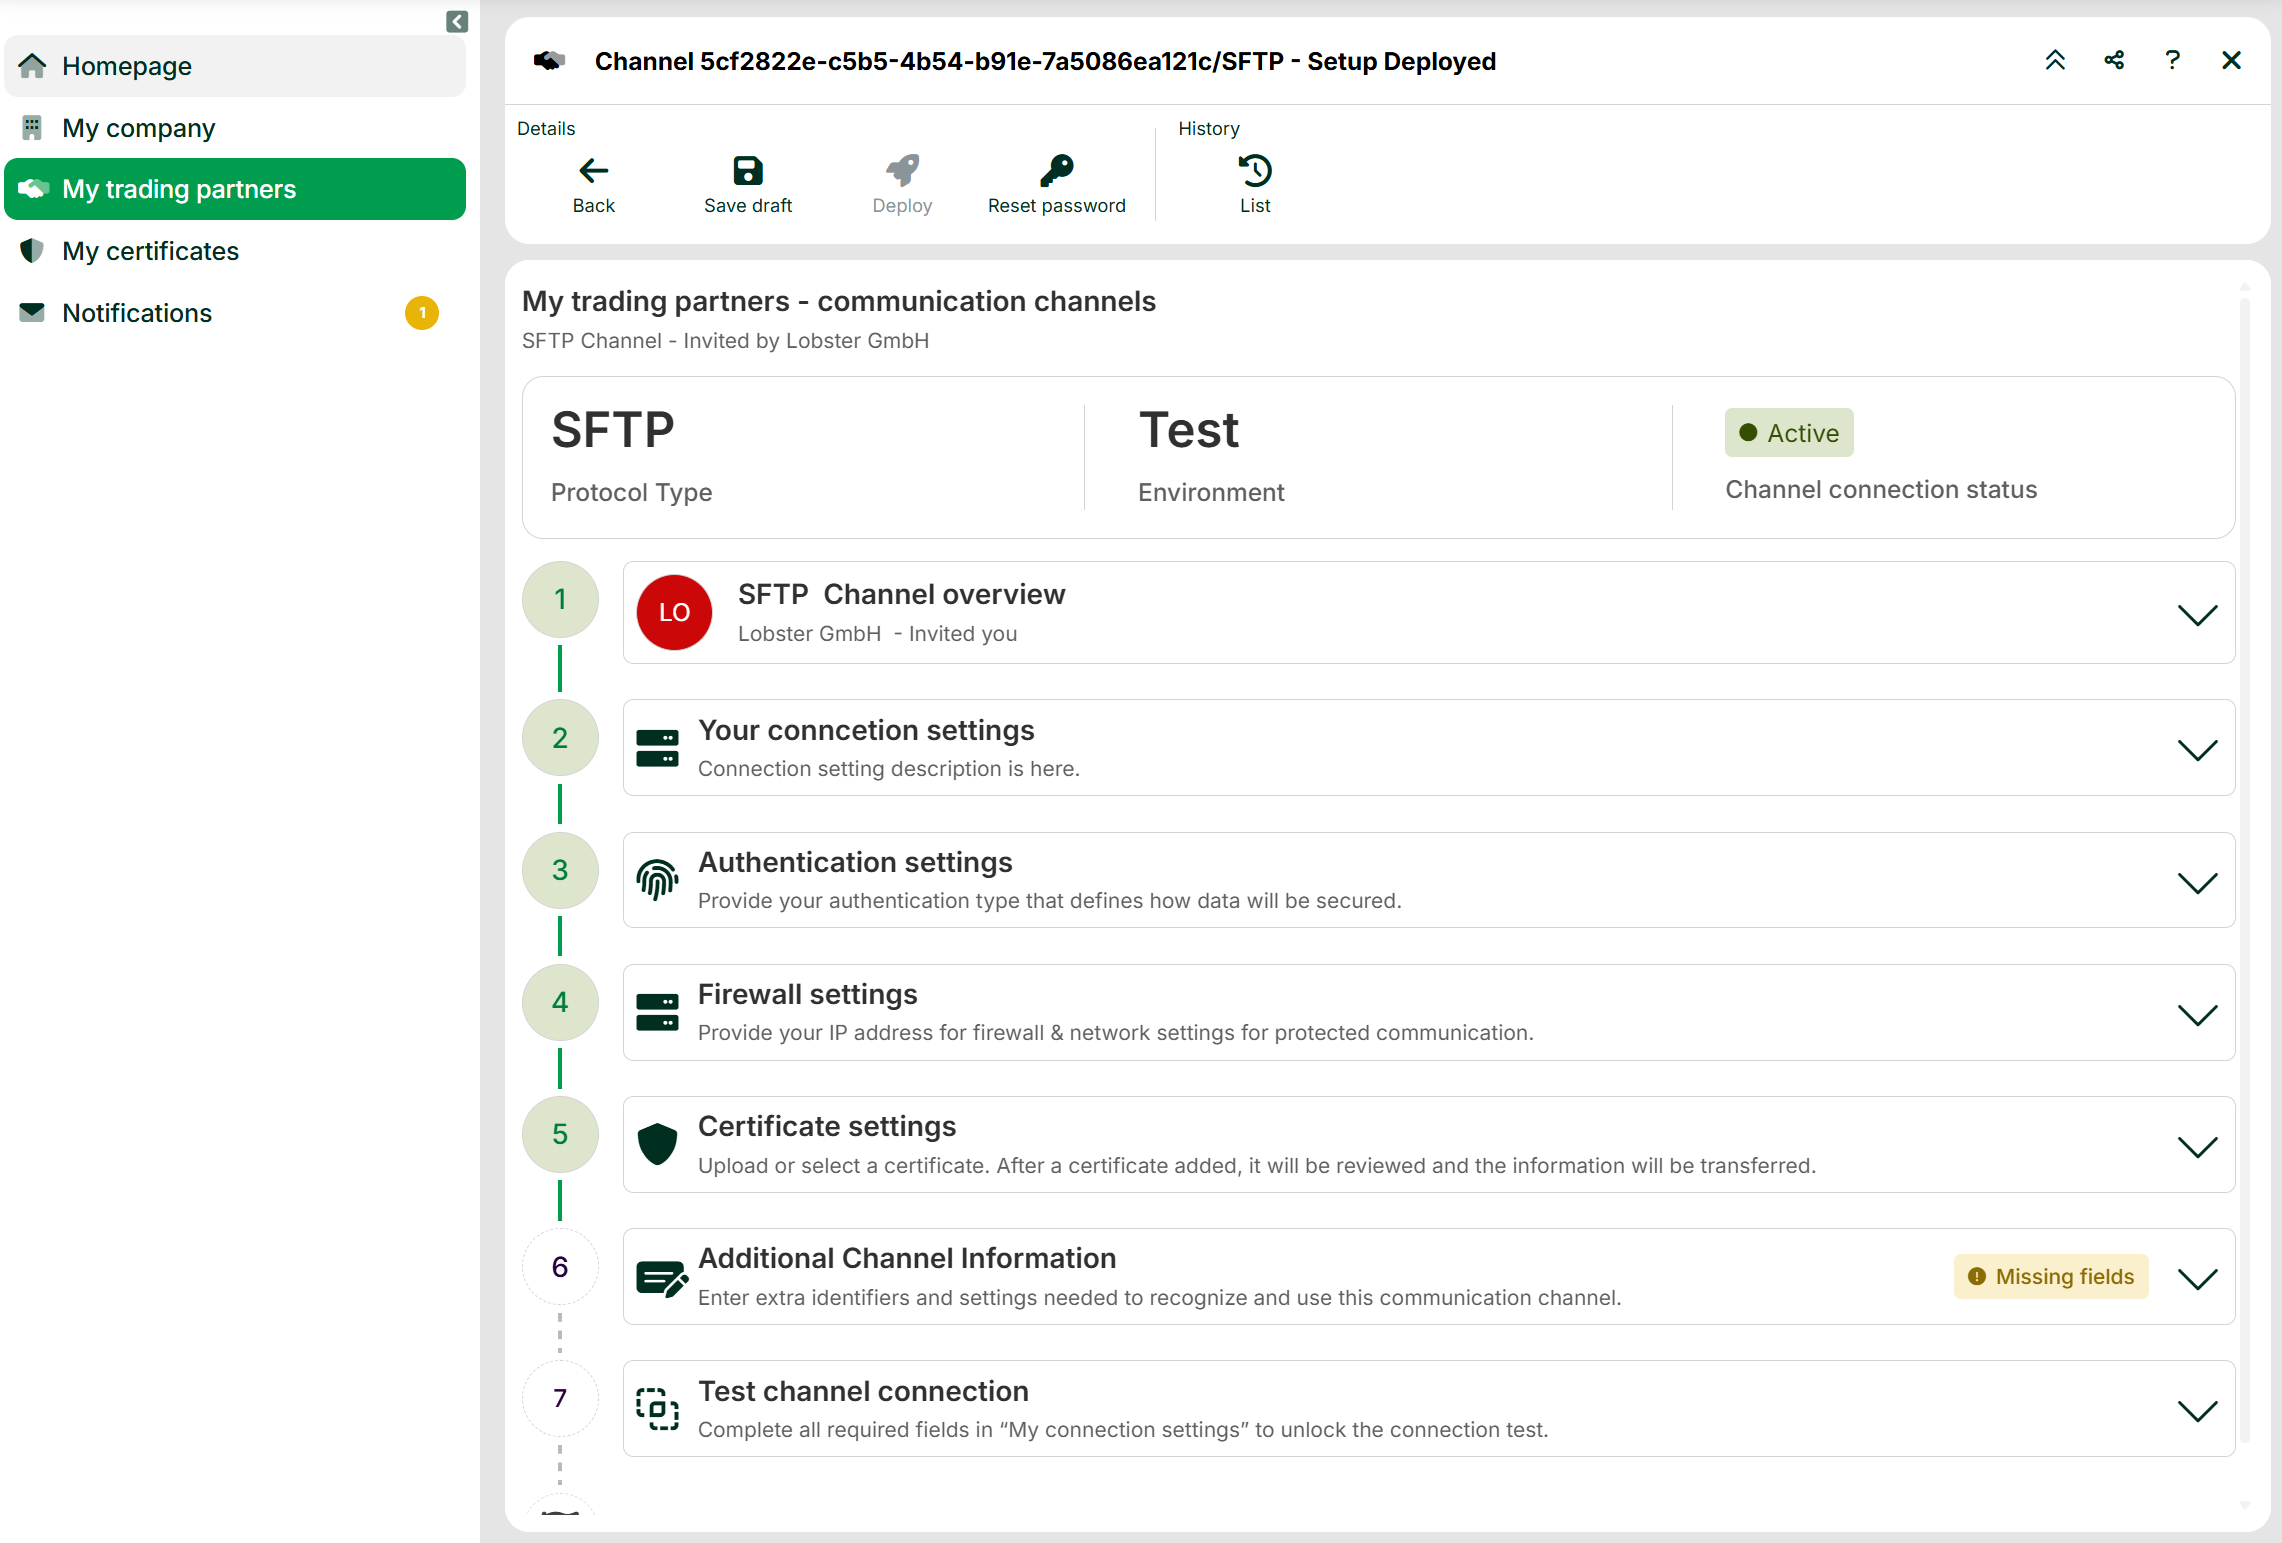
As a partner, go to My trading partners. Open the entry, then open the communication channel.

Click Edit. Now you can enter all the channel details.
NOTE:
For SFTP connections, this address must always begin with
ssh://. Otherwise, the Trading Partner Manager will not create the channel (SSH channel) correctly. Enter the publicly accessible IP address of your system here.
Enter additional information about the channel (partner)
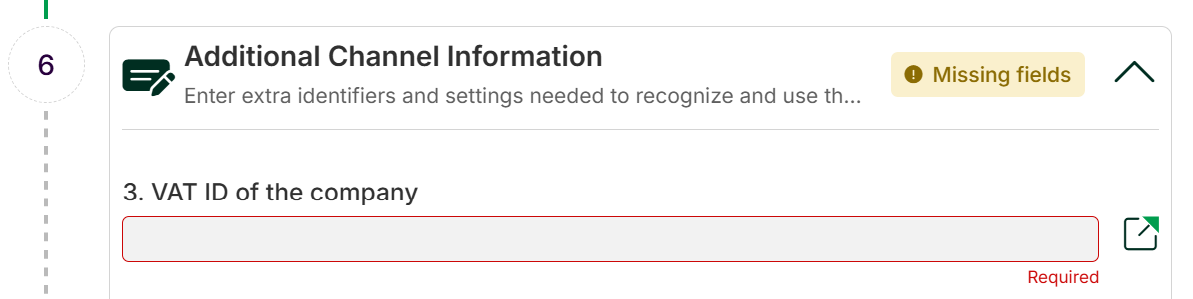
If a value is still missing from a required field, the Trading Partner Manager will mark the Additional Channel Information section as Missing fields. Enter the missing values to complete the setup.
Changing channel details (partner)
If you change the channel later, repeat the Confirm setup step. Only then does the Lobster Data Platform apply the changes to the channel. Both parties (LDP user and partner user) should always make changes in the Trading Partner Manager.
Renewing and replacing certificates (partner)
As a partner, you open My certificates. The Trading Partner Manager shows the certificate overview. The overview lists all certificates with status, metadata, and validity period. Here you upload new certificates. You replace existing certificates immediately or schedule the exchange. You also see the details of each certificate. A certificate that expires soon carries a warning icon.
Open an existing entry and click Renew certificates in the ribbon.
Upload the new certificate.
With the Scheduled certificate renewal option, you can set an activation date. For urgent cases, select the Immediate certificate renewal option.
.png)
Renew Certificate options including upload and scheduling for certificate expiration
The Trading Partner Manager reminds you in time by email. Depending on your selection, it sends a reminder 90, 30, and 7 days before the certificate expires, or on a custom date.
The Trading Partner Manager activates the new certificate automatically on the set date. Your channels remain in operation unchanged. Until the switch, both certificates are visible in the overview.
After the renewal, check whether your channel references the new certificate. The Trading Partner Manager shows the new certificate in the related channel. The new certificate is also visible on the Lobster Data Platform.
Result
The new certificate is active (immediate switch) or scheduled for the switch (scheduled switch). The certificate overview shows status, validity period, and the channels in use.
NOTE: Once no channel uses the old certificate anymore, you can delete it. As long as a channel uses the certificate, the Trading Partner Manager blocks the deletion and shows the affected channels.
Checking the created channel (LDP user)
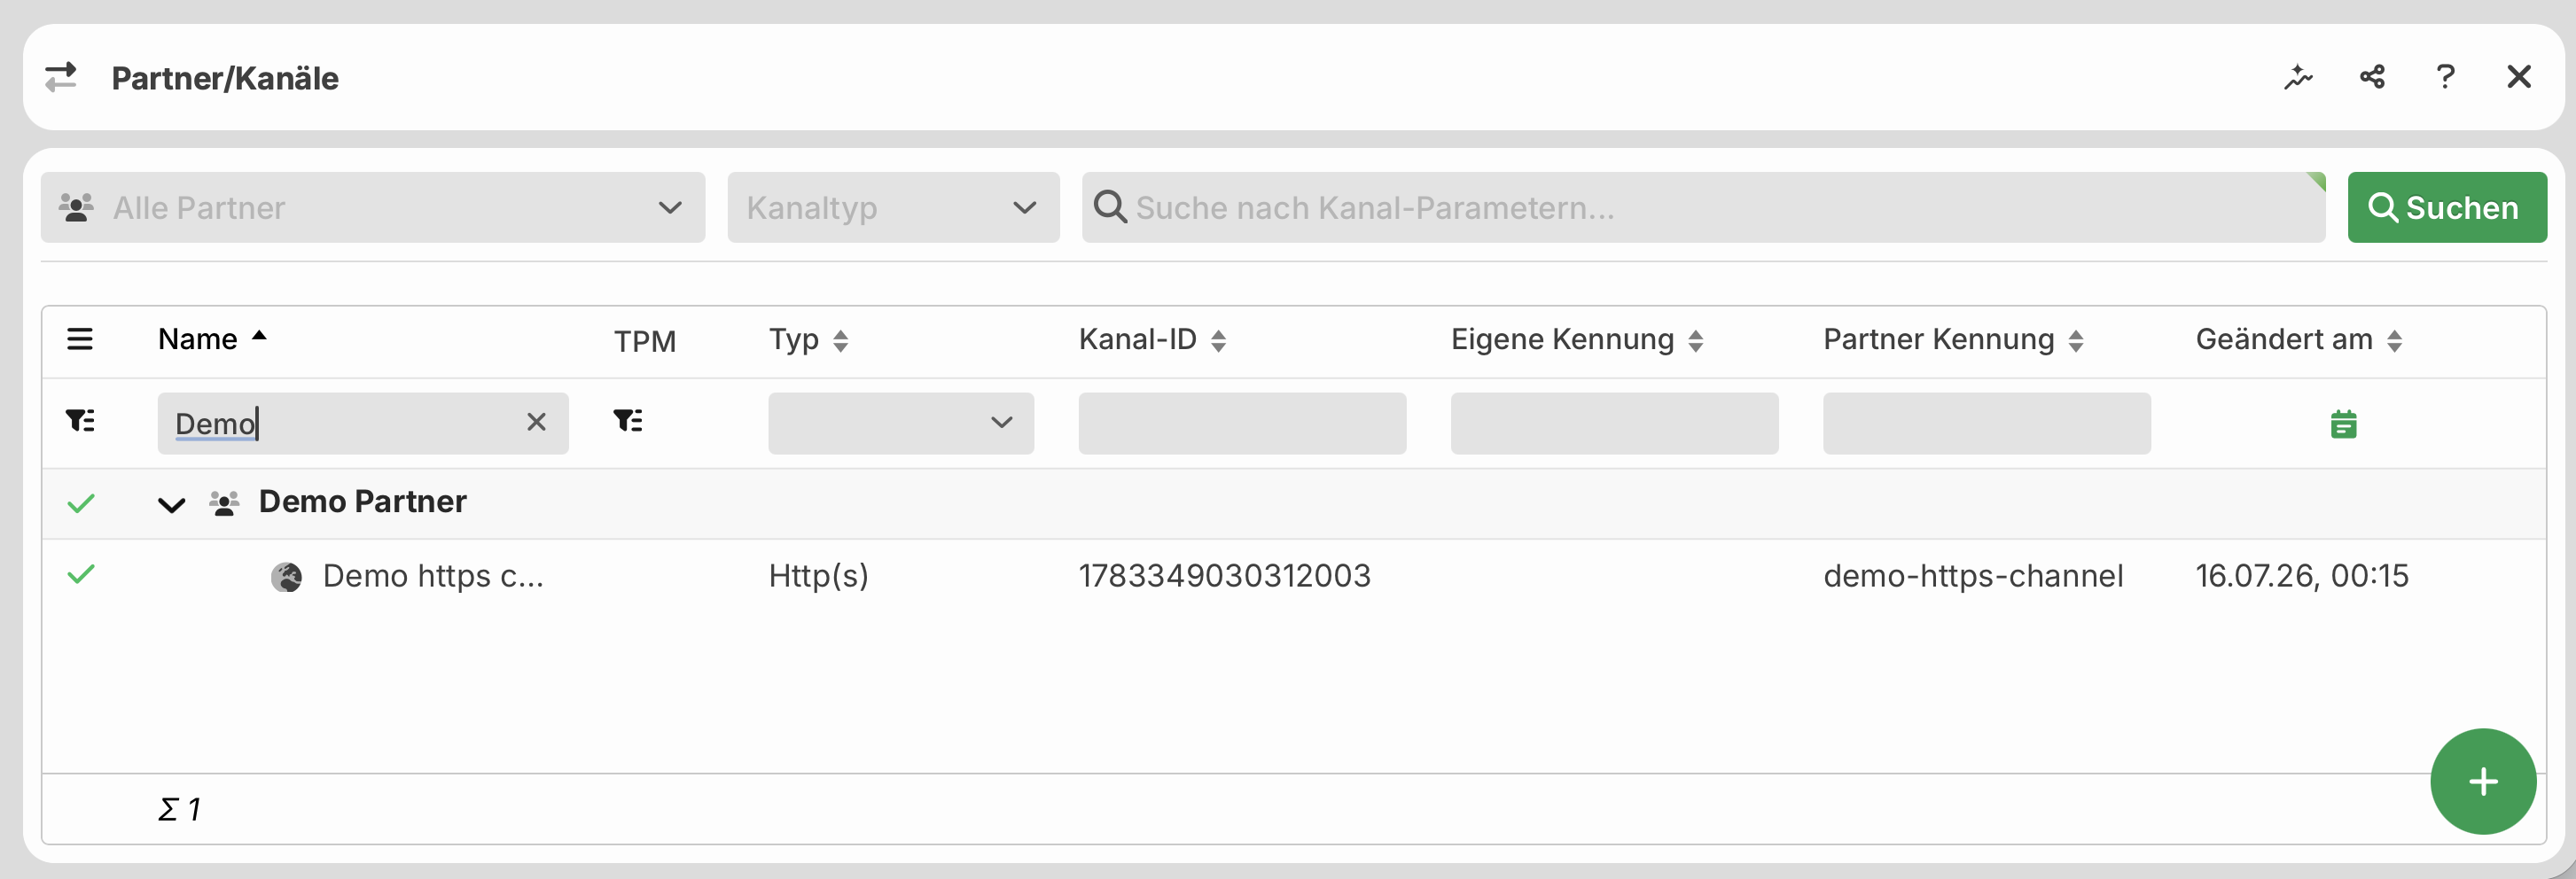
The setup is now complete. The Trading Partner Manager then creates a partner with a channel on the Lobster Data Platform.
Navigate to Administration > Partners > Partners/Channels.
Testing the channel connection (partner)
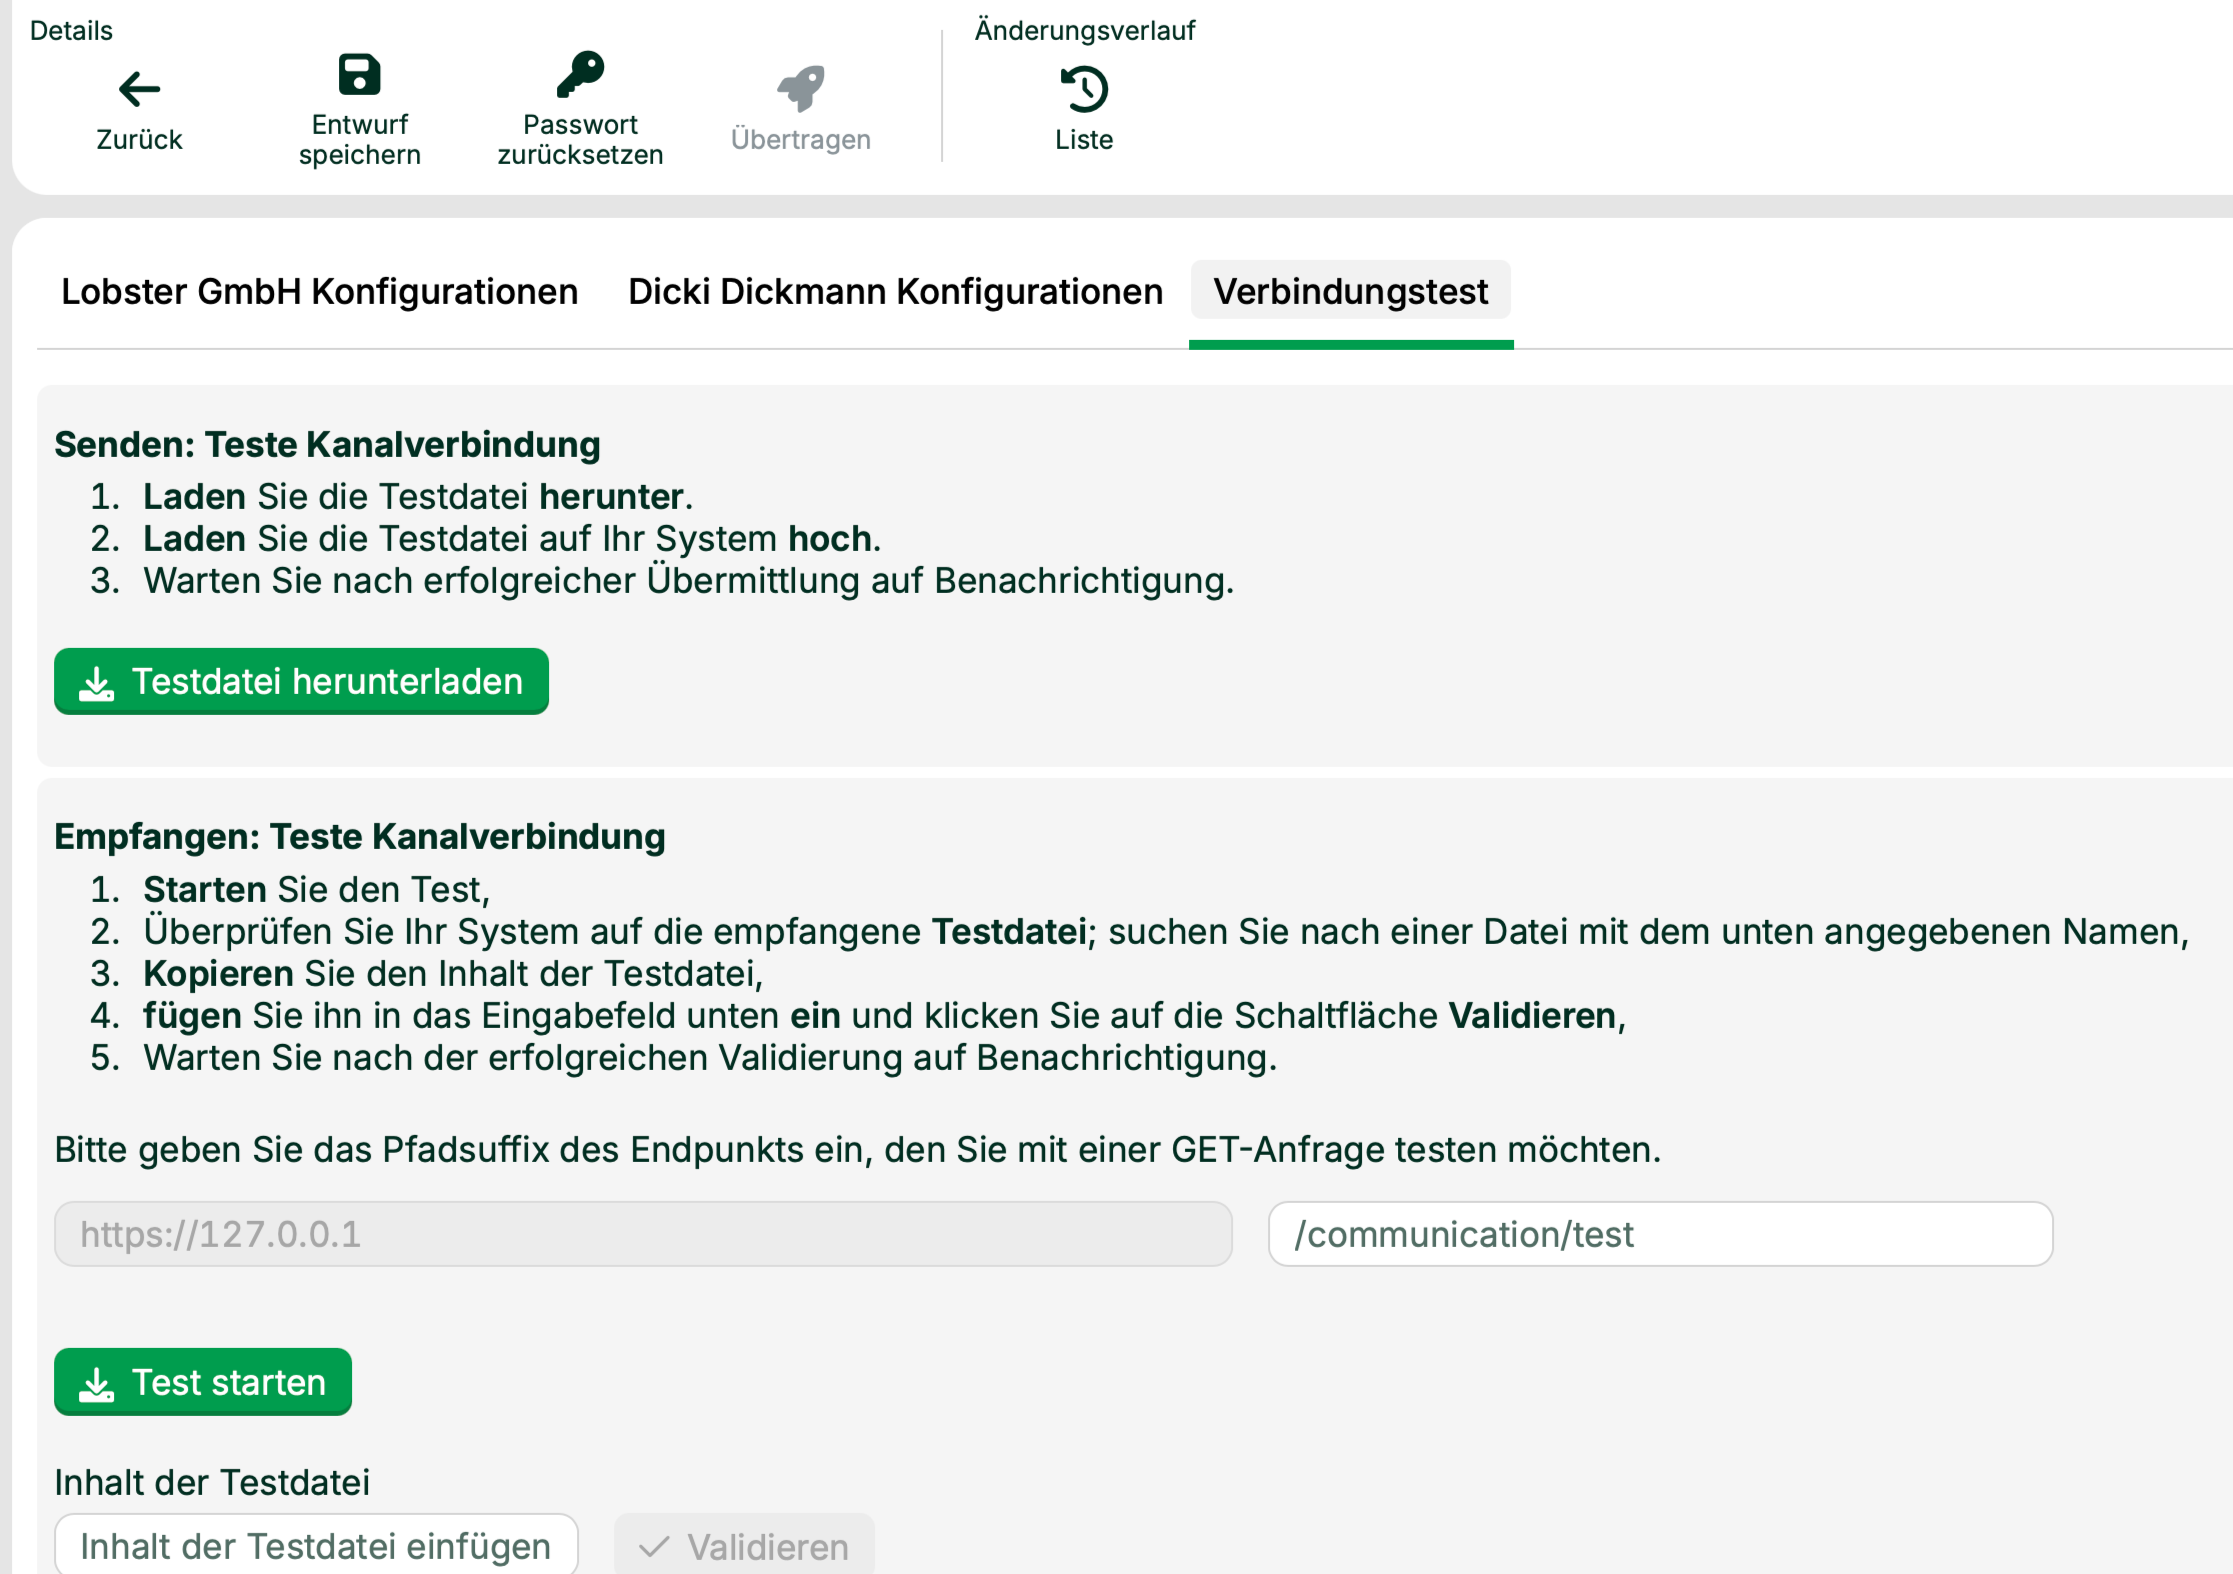
As a partner, you test the created channel for sending and receiving. You find it under My connections in the Connection test tab.
Procedure
This test checks the connection to the Lobster Data Platform. Click the Download test file button. Upload the file to the Lobster Data Platform with the specified connection details. You find the connection details in the Lobster GmbH configurations tab. Use the public IP address, if available. You also find the certificates there. If the upload succeeds, the test is successful.
This test checks the connection to the partner system. Click the Start test button. Check whether the file arrived on the partner system. Copy the content of the file into the Test file content field. Then click Validate. If the content is correct, the test is successful.
Adding further channels (LDP user)
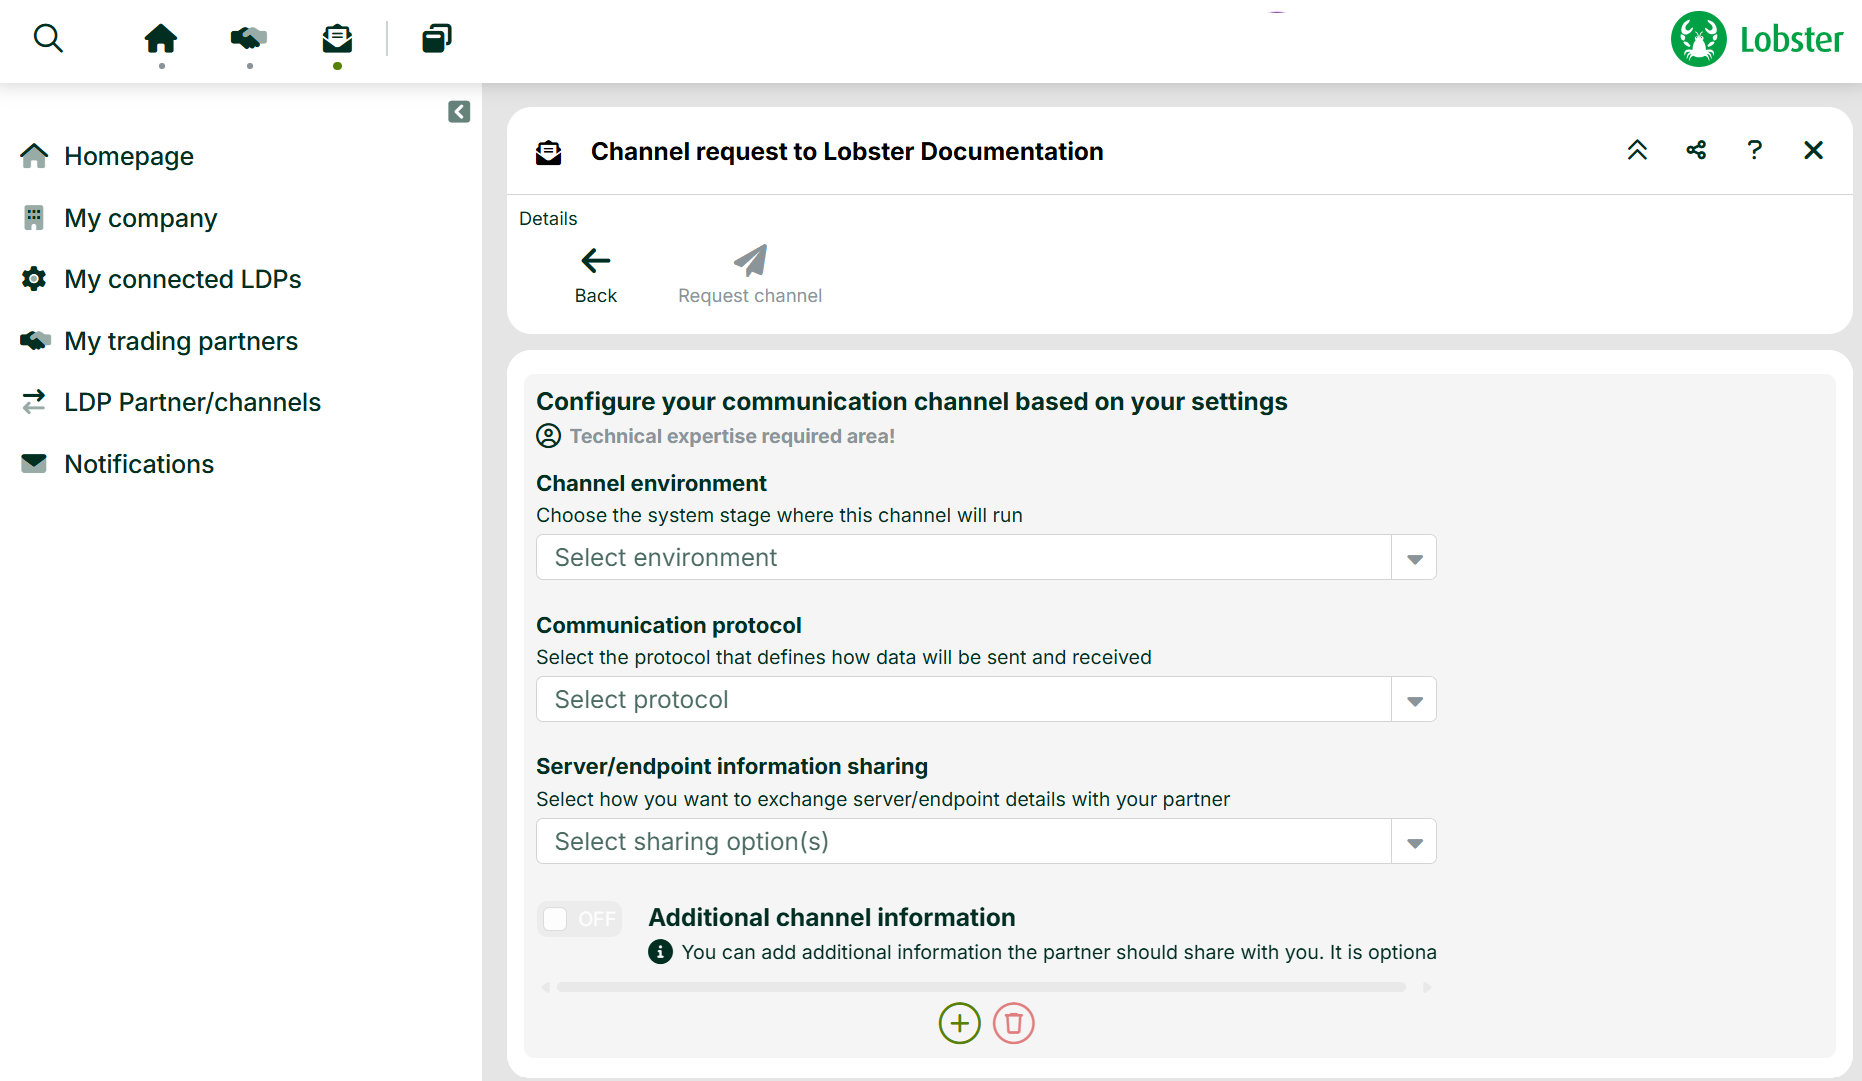
To add further channels to a partner, navigate to My trading partners in the Trading Partner Manager. Open the trading partner and click Add channel. Repeat all steps for configuring a communication channel.
Importing existing channels (LDP user)
You have configured a channel manually on the Lobster Data Platform. You can transfer this channel to the Trading Partner Manager. The channel remains functional during the migration.
Prerequisites
Role: customer administrator with access to the Trading Partner Manager.
Your LDP environment is registered in the Trading Partner Manager. NOTE: The LDP version is at least 26.2.0.
The channel to transfer is active on the Lobster Data Platform.
Procedure
In the Trading Partner Manager, navigate to LDP Partners/Channels.
Open the channel import area of your registered LDP environment. The Trading Partner Manager shows you all available channels of this environment.
Select the channel from the list. If Migratable channels shows
0, no channel is migratable.In the ribbon, click Migrate channels to TPM.
Confirm the security prompt.
Before the transfer, the Trading Partner Manager asks whether you really want to migrate the channel.
NOTE:
The Trading Partner Manager currently supports the transfer of single channels only. A bulk import of multiple channels is not possible. If the transfer is blocked for a channel, the Trading Partner Manager shows an error message with the cause.
Check the status of the partner. If no account exists in the Trading Partner Manager yet, the system automatically sends an invitation to the partner. If an account already exists, the system informs the partner about the upcoming transfer.
Wait until the partner confirms the channel details in the Trading Partner Manager. To do so, the partner clicks Confirm setup.
IMPORTANT:
If the partner rejects the transfer, the Trading Partner Manager reverts all changes. In this case, you receive a notification.
Result
From the partner’s confirmation on, the channel is marked as managed by the Trading Partner Manager. From now on, you maintain changes to this channel centrally in the Trading Partner Manager.
Viewing notifications (LDP user and partner)
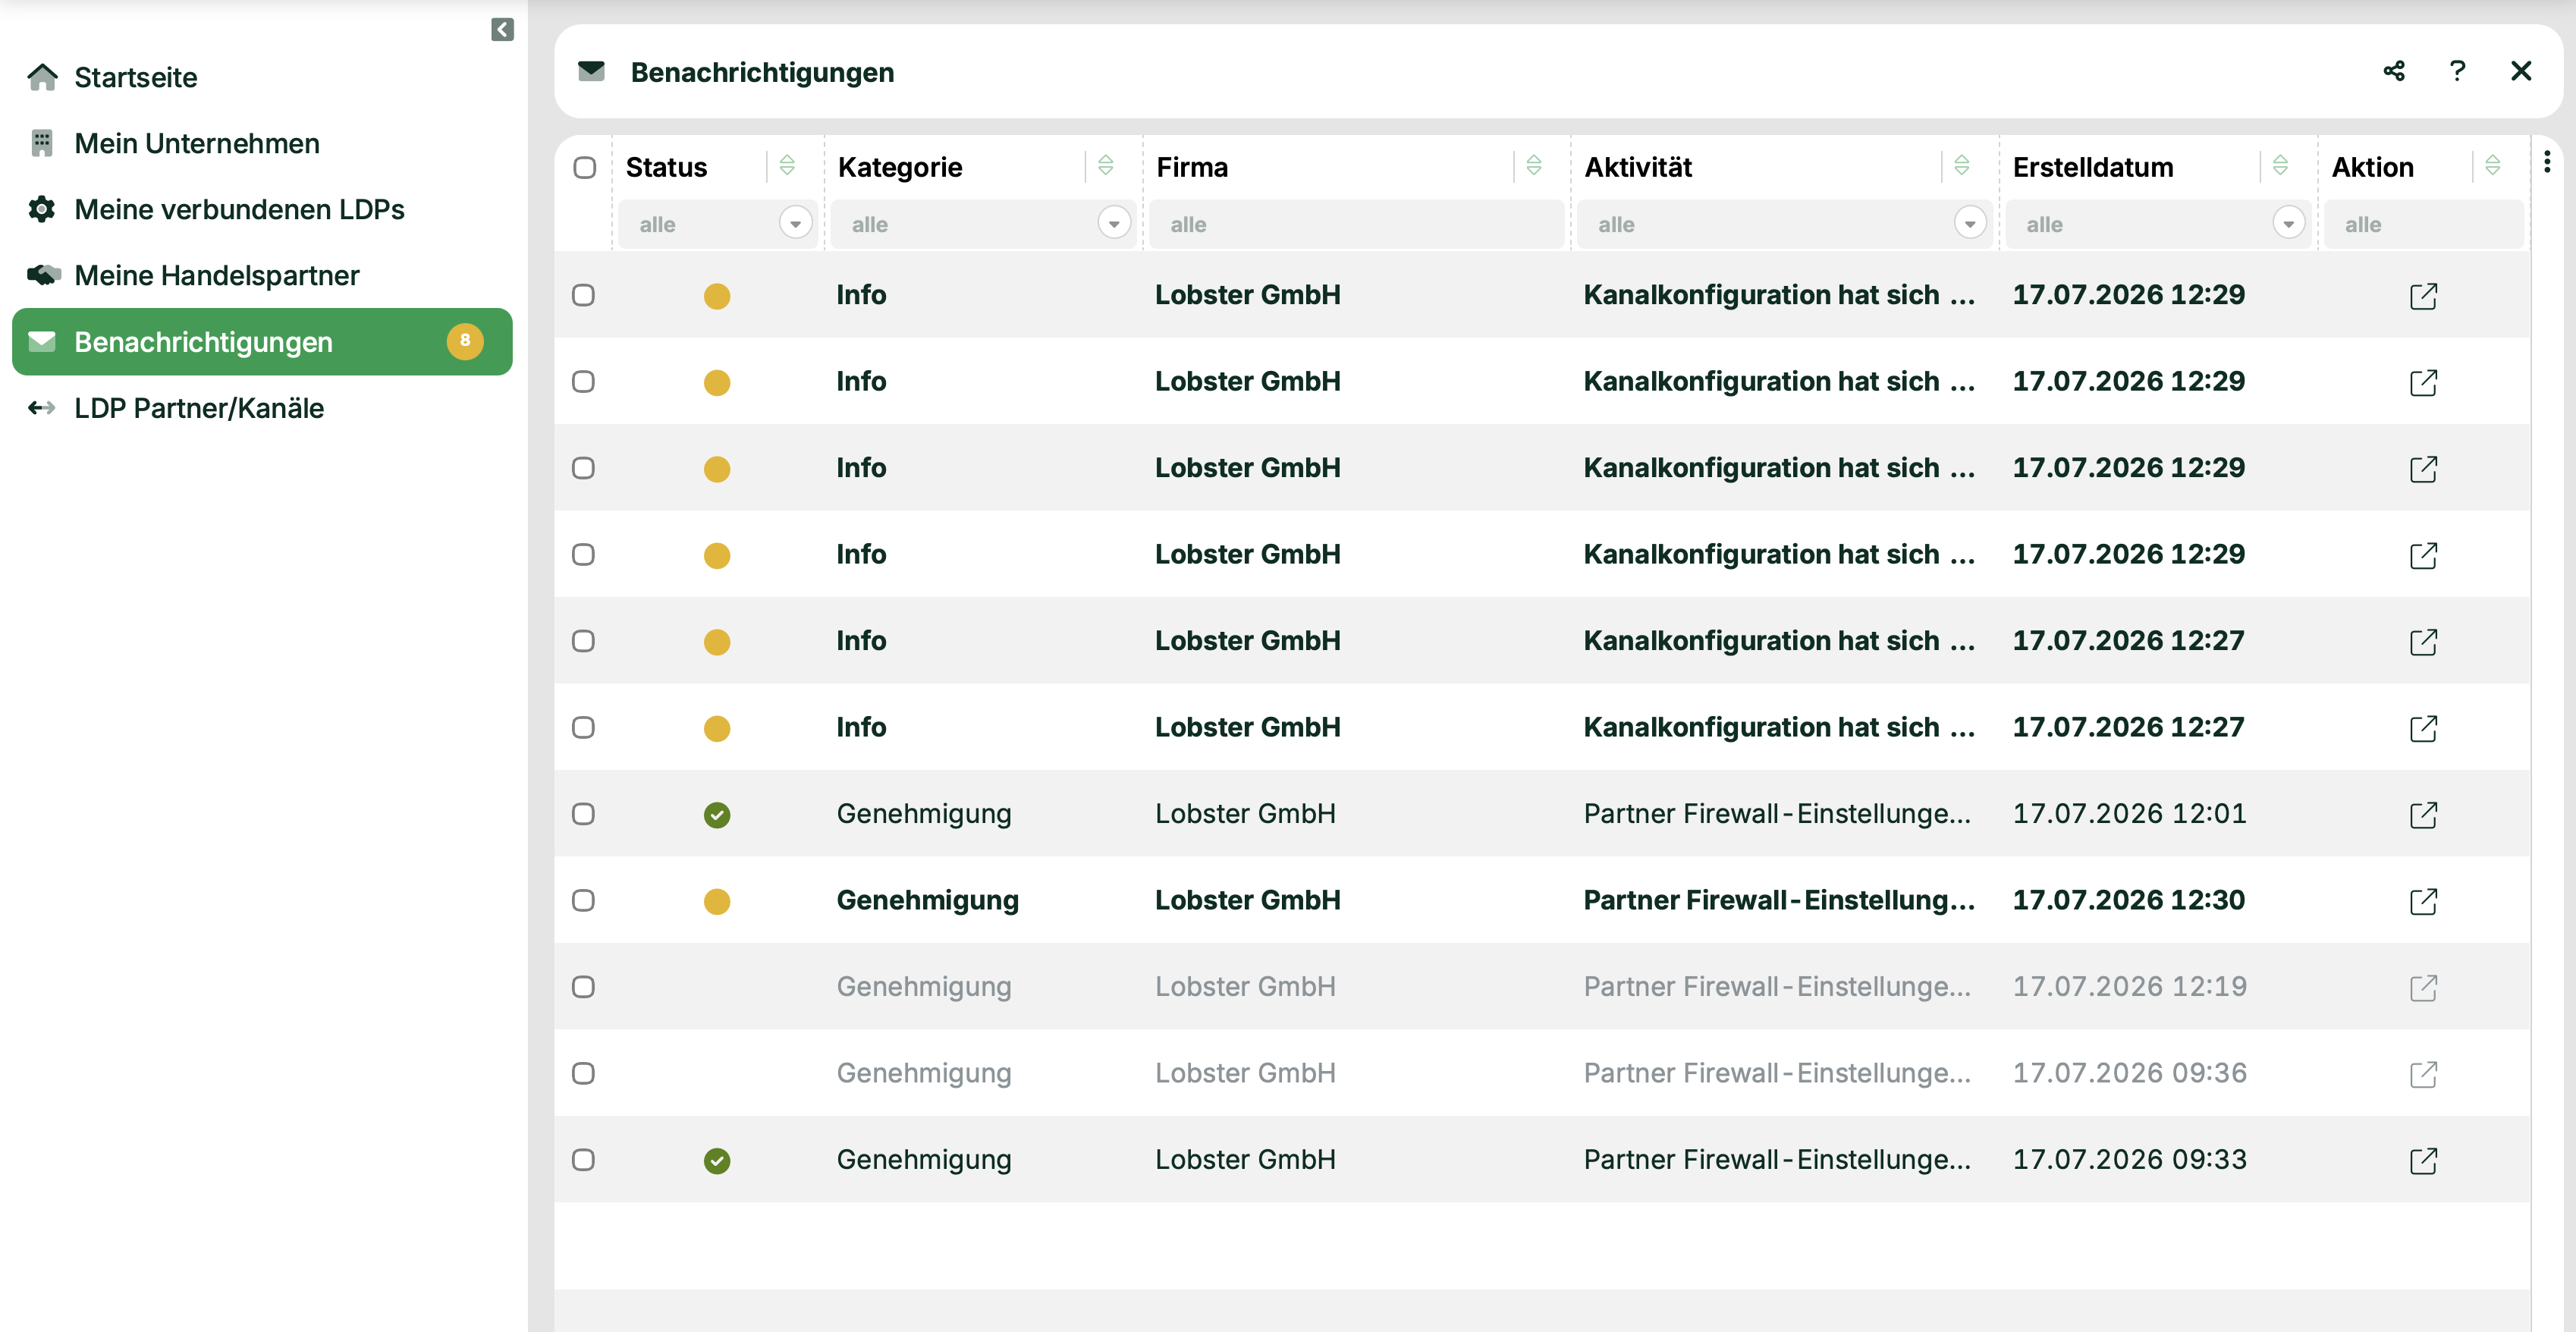
The notification overview in the Trading Partner Manager dashboard keeps you informed about pending tasks and status updates. You find the notifications at the bottom of the Home page or directly under the Notifications entry.
Prerequisites
Role: customer or partner with access to the Trading Partner Manager.
Triggers for notifications
Trigger | Details |
|---|---|
New request for a communication channel | |
Communication test successful or failed | |
Channel setup changed | A new test is required. |
Certificate change required | Among others, 90, 30, 7, and 1 day before a certificate expires, if no renewal is scheduled yet. |
Requested channel setup canceled |
NOTE:
If the partner changes the setup of a channel, the Trading Partner Manager notifies the customer, and vice versa. For a changed channel setup, the other party additionally receives an email.
Procedure
Open the notifications in the Trading Partner Manager.
The Trading Partner Manager marks unread notifications orange.
If needed, filter the list by notification type in the Category column header (Task, Approval, or Info).
Open a notification by double-click or via
 to go directly to the related editing page. The Trading Partner Manager then marks the notification as read (green).
NOTE: You only see notifications that occurred after you created your account.
Result
You see the current status of your channels, certificates, and approvals at a glance. One click takes you to the matching editing page.
Viewing logs (LDP user)
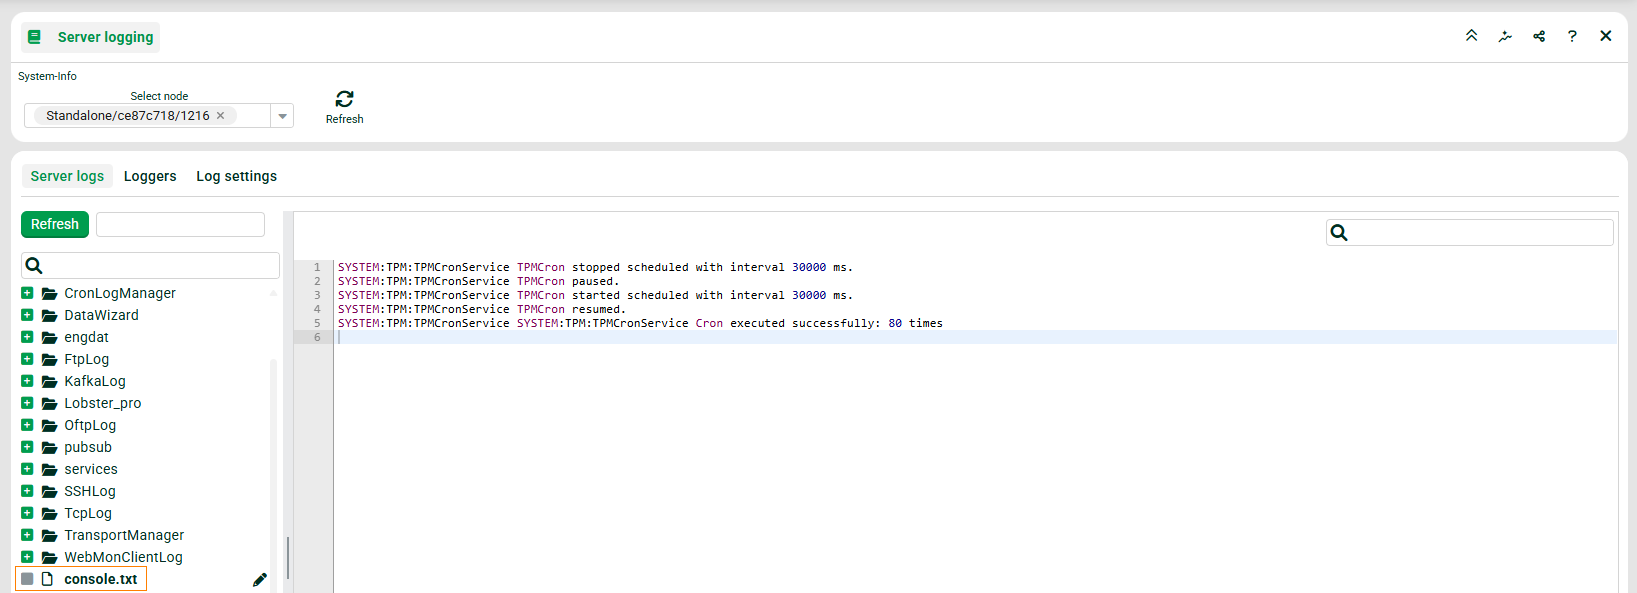
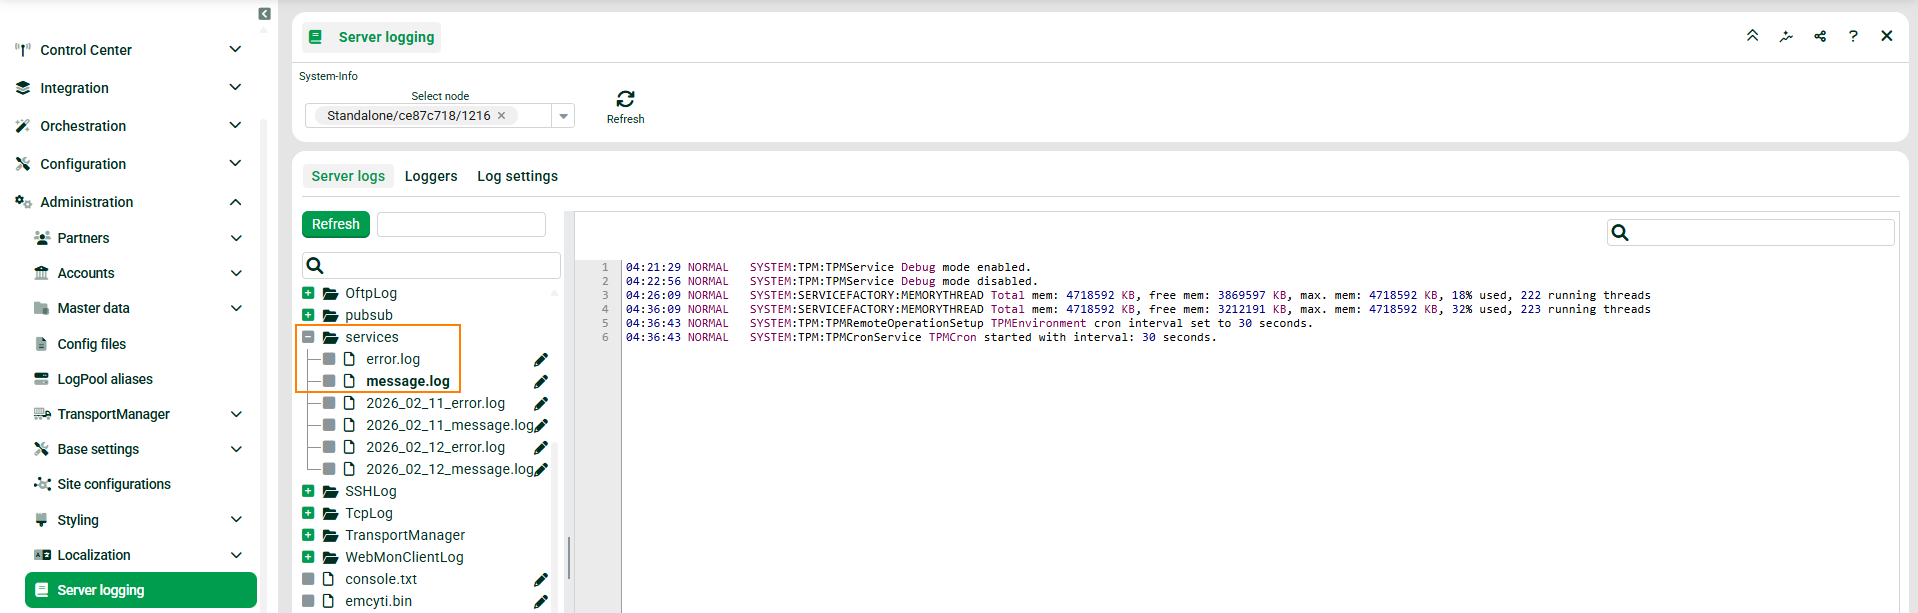
You find logs for the Trading Partner Manager under Server logging > Server logs > services (message.log and error.log). Search for TPM.
Activating debugging mode
To activate or deactivate debugging mode, use the following REST API calls:
http(s)://<URL/IP of LDP>/tpm/debug?debug=true
http(s)://<URL/IP of LDP>/tpm/debug?debug=false
In debugging mode, the Trading Partner Manager additionally writes the logs to the console.